


|
|
|
|
|
|
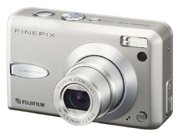
| Arn | profile | all galleries >> tests, samples, misc stuff >> Fuji F30 test / review | tree view | thumbnails | slideshow |
update 2008.08.10 / the new Fuji F100fd reviewed here.
update 2007.12.4 / F30 compared to F50 - 14.5 compared to Fuji
F50
update 2007.04.19 / exposure on F31fd and following models - 2. contrast
and exposure
update 2007.03.07 / foreword updated
update 2007.01.22 / small update to the foreword
update 2006.10.25 / some notes about noise reduction in low contrast scenes in part #12b
- high ISO & low contrast.
update 2006.10.25 / I made the samples gallery easier to find (part #18)
- samples gallery.
update 2006.08.28 / short note about focusing in part #5
- Focusing.
update 2006.08.11 / short note about corner softness of cheap DSLR lenses vs F30 in part #13
results.
update 2006.08.11 / re: spot metering (I must have been delirious when I first wrote this part)
update 2006.08.9 / re: Neatimage settings ISO 100 to 3200
Foreword and notification ^
I selected this camera to be my carry-around camera in June 2006 from amongst all the available brands and models, because judging by
the available and trustworthy tests (like the one at DPreview.com) that I had read, the Fuji F30 had the best all-round image quality in it's class and definitely the best high-ISO image quality. This was true at the time and (as incredible as it seems) has continued to be so, at least until recently (2008/june). The recent Fuji cameras have been unable to improve high-ISO image quality, but at the lower ISO's of ISO 100 and ISO 200 at least the F100fd seems to be able to best the F30 (with ISO 800-1600 the F30 is still among the champs when we talk about digital compacts and better than the F100fd). Some features have been added (the F100fd has 28mm - 140mm equivalent lens) and sadly some features have been removed from these later cameras (for example aperture and shutter priority are missing from the F100). Also some image quality quirks have crawled into the new F100fd model. I am now reviewing the new Fuji F100fd here.
This test/review concentrates on the aspects of the camera that are useful to know in practical everyday photographic situations. I
don't compare the camera to other pocket cameras, but such comparison has been already made very thoroughly by, for example, DPreview.
I know it's customary to list the negatives of a camera in the END of a review, but I'll break the tradition and do it in the very
beginning. Here's a list of (important) features that the Fuji F30 does NOT have, but some other brands / cameras do (although none of
the cameras available today have all of the features combined with good image quality):
- no reasonable wideangle (28mm equivalent)
- no live or preview histogram
- no optical image stabilizer
- no possibility to change sharpening / contrast / saturation settings
- no manual focus mode
The following observations come from someone, who uses and likes to use post processing programs to
improve images. I don't want the camera's output image to be ready for print, I want it to be
the kind that can be tuned in to the best possible with a *little* work. So, if you want to use
your camera for happy snap-shooting, without worrying about post processing at all, there is going to be a lot of text that you want to
skip.
Contrast and exposure on F30 ^
Contrast curve is on the high side, but burning of highlights seems to be often a matter of
overexposure. In practice, for Multi metering, I often dial -1/3 or -2/3, even -1 ev exposure
correction to produce correctly exposed images. Average metering exposes images more accurately, so I usually use 0 or -1/3 exposure
compensation for Average metering.
Metering ^
In most cases Average metering results in less exposed and more importantly, more correctly exposed
images compared to "Multi" pattern metering (and thus there's less fear of overexposure).
"Multi" metering has a tendency to overexpose.
When using Average metering, you have to remember to compensate for images that
are getting too dark with positive exposure correction (ev+), something that happens more rarely with Multi metering.
If a significant area of the image is bright surface/sky/etc, the camera will usually underexpose rest of the image, if the rest
of the area is darker. On the other hand, if most of the image area is dark, the main object may be overexposed. Use your +- EV button
to compensate.
Basically it's all about getting to know your preferred exposure mode and to know WHEN to dial negative or positive exposure correction. Remember that you still have to use positive exposure correction on most back lit objects (even with Multi metering), if you want the main object or the whole scene correctly exposed. The results of average metering may be easier to predict and you don't have to dial as much negative exposure correction. If you use the Multi metering setting, you need to dial -1/3 to -1 ev all the time.
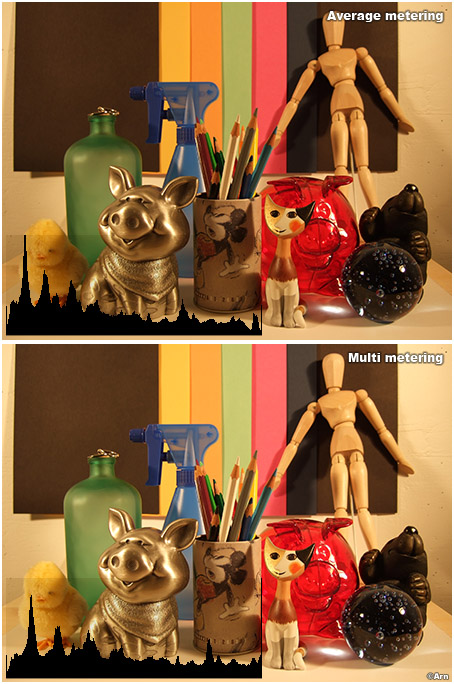
In the above still life setup, Multi (= Pattern) metering produces a slightly brighter exposure and the hilights are more clipped than in the Average-metered version. In this image it wouldn't have made THAT much of a difference, since there is no clipping of hilights in any place where it matters - expect perhaps the piggie's tin skin. But Multi metering will ruin some images with it's over exposing tendency, if negative exposure compensation is not used.
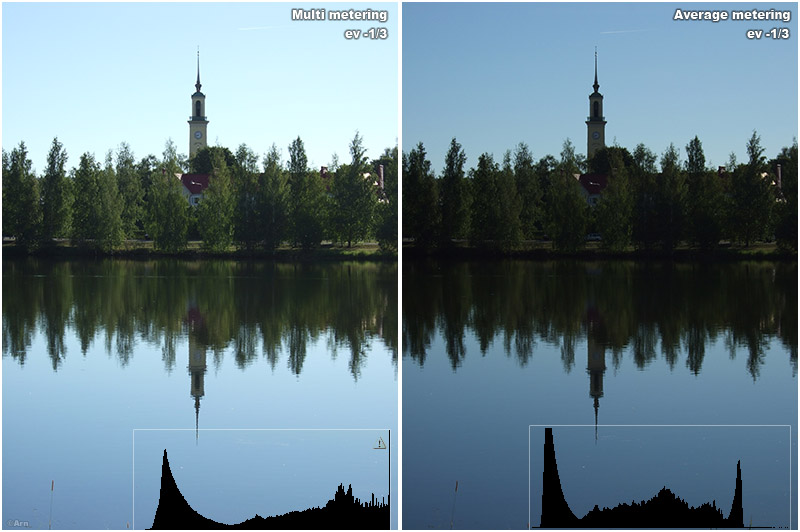
In the above metering comparison, the pattern metered image is obviously a little over exposed in the sky and the highlights are cut. The average metered image is unfortunately underexposed (could have been better exposed without the -1/3 ev negative exposure correction) and it would be too dark like this. But the pic with Average metering might be made in to a better image than the pattern metered image with a simple Levels or Curves layer.
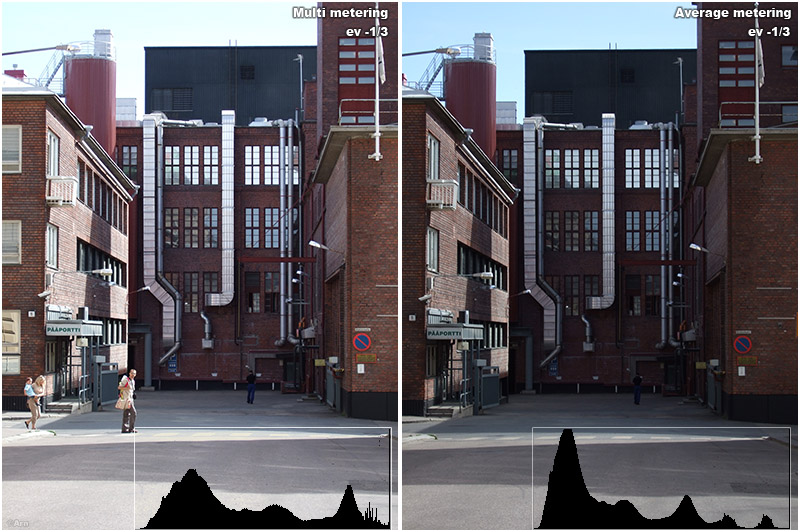
Same thing in the example above. The highlights are obviously cut in the Pattern metered image on the left, but the Average metered pic on the right could use some lifting of the shadows with Levels / curves.
Spot metering ^
Use this feature when you want to make certain that the area of interest (often a small part of the image area) is correctly exposed.
Spot metering will be measured from the small central part of the image, so it is a good idea to use this feature with the center
focusing mode. This way, the part of the image that you metered, should be correctly in focus too.
Using spot metering with Multi focusing mode may result in metering/focusing errors (or rather - surprises), because the camera may
select a focusing point different from the point of metering. Usually I would like the point of spot metering and focusing to be the
same, because I want the center of interest in focus.
Focusing ^
Focusing at further than macro distances is quick and reliable. Both center point focusing and multi pointi focusing seem to
work well.
Focusing at macro distances is pretty slow, noticeably slower than at normal focusing distances.
You would be a lucky devil to succeed in focusing on flying insects, etc. That is to say - you can forget it.
Also, closest focusing distance (when not in macro mode) is not very close (60cm), so remember to turn on the macro mode
on when DO you get close.
Focusing in low light is one of the strong points of the camera. The focus assist light is powerfull enough to help
focus in total darkness.
There is no dedicated manual focus mode on this camera and that is a seriosly restricting feature.
I would love to be able to lock the focus at closest possible distance to make close up photography faster and easier.
Some people use the Landscape mode to focus to infinity quickly, but that mode is seriously limited for other kinds
of photography. Also, the Landscape Scene mode raises the ISO more quickly than M or A/S modes.
White balance ^
Auto white balance seems to work pretty well in every day situations, but when I was shooting
the test still life with two 500w halogen lamps, AWB gave a pretty warm result. Selecting
Manual white balance straight from the scene resulted in the image temp going too blue. When I
placed a white paper in front of the camera (really, most any white object is sufficient, you
don't neccessarily need any pro "white card") for the manual WB metering, the image was
rendered with almost perfect white balance, if a bit cool.
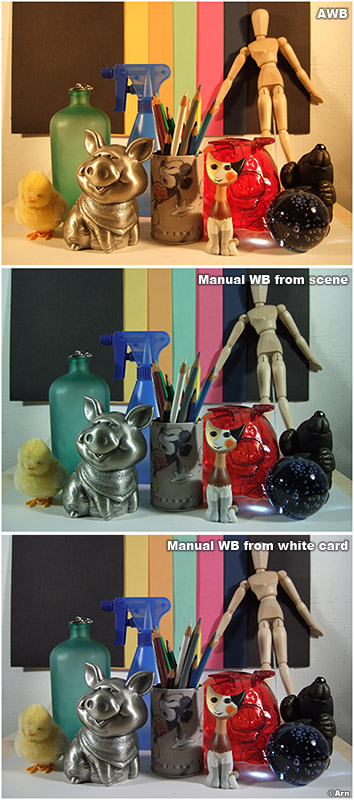
NOW... the question is: was the scene REALLY to my eyes like it was for AWB or was it like Manual balance with white card is showing it? For many shots, I don't wan't the colors to be perfectly balanced, in fact I would probably prefer a warm, yellow cast if that was what it really was like in the scene to my eyes. On the other hand, for set up "studio" ;) shots I would probably prefer the properly balanced colors.
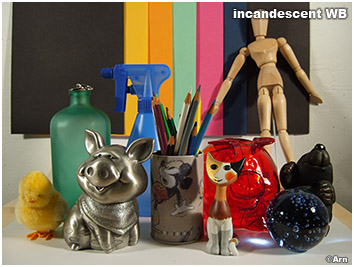
Incandescent white balance actually rendered the 2x500w halogen lit scene very suitably, with a little more yellow and warmer colors. In this case, I felt that the Manual white balance setting maybe made the image too cool (but the blues were better). Btw, Incandescent color temperature is 2800K and Halogen is 3200K, so the difference is pretty small.
In everyday use, I would recommend the Auto setting to be the "default" setting for white balance and when need be, change to use the appropriate preset WB setting (like Shade WB). One thing I would NOT do is select Shade WB in sunny conditions to try to increase apparent saturation of an image (I think this is what some have suggested). I feel that the saturation of F30 images is quite enough and certainly enough in images with correct exposure and white balance. Selecting for example "Shade" white balance on a sunny day would just make the image more yellow. If the colors seem a litte off or pale, I would rather try the matching preset WB setting (i.e. "Fine" for a sunny day) or Manual White balance. Images can be oversaturated in post processing if neccessary. For actual cloudy/shady lighting conditions, the Shade WB often produces good results, of course. Then again, if you want to take artsy pictures with mescaline colors, you can select absolutely any WB setting that pleases you! :)
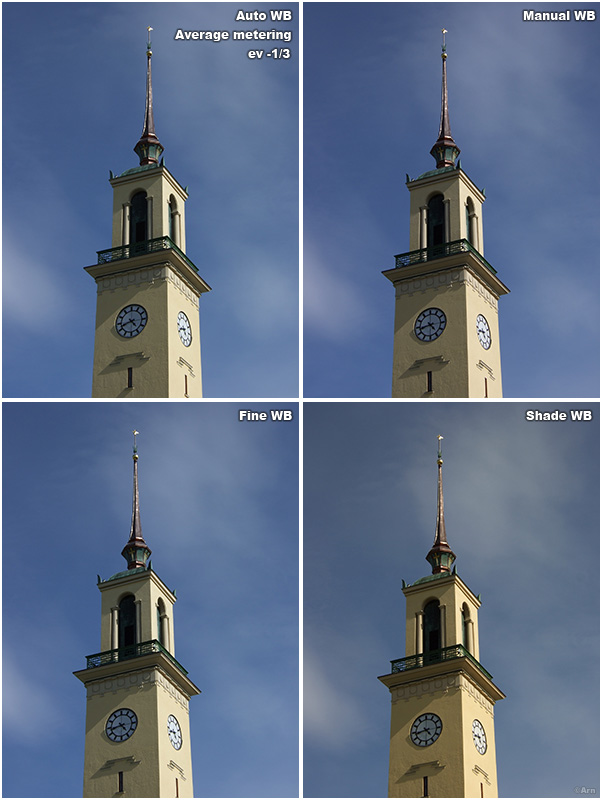
Above is an example of a sunlit scene with four different white balance settings. Auto, Manual white balance (metered straight from scene without white card) and Fine all did a perfectly satisfactory job of setting the WB. Shade white balance turned the scene too yellow. The sky is no longer blue in the Shade WB image.
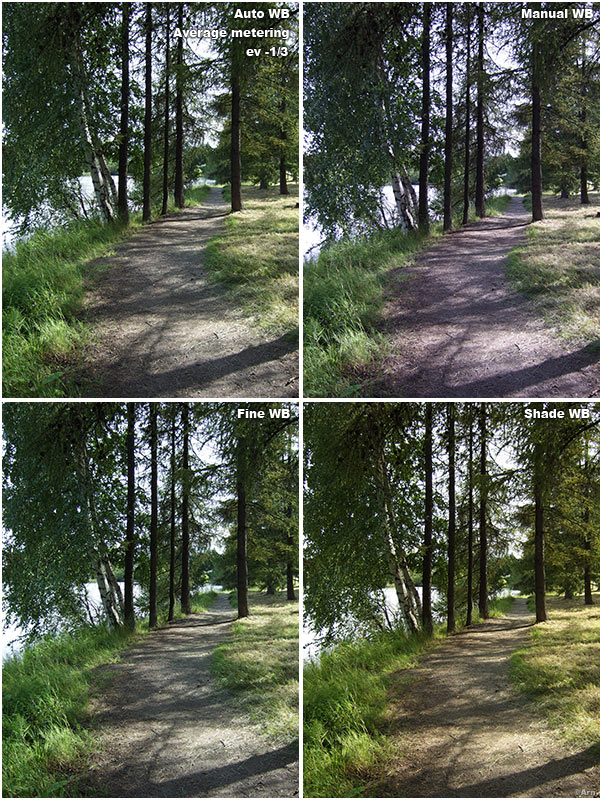
In this image the white balance settings that were nearest to what the eye was seeing are Auto
WB and Fine WB. The Manual WB is too cool for an image of greenery. The best settings for this
particular image, would be (to my eye) Shade WB, because the yellow cast is actually improving
the image.
Information about color temperature on Wikipedia:
http://en.wikipedia.org/wiki/Color_temperature
Sharpness, detail, barrel distortion ^
Wide angle produces generally sharper images than full zoom in the center of the frame and in
the corners. The difference in sharpness between wide angle and full zoom is not huge, but noticeable.
The widest angle setting is the sharpest focal length on this camera. Also, the biggest apertures are
generally sharper than the smallest apertures. As is always the case, widest focal length setting has the most barrel
distortion, which is reduced somewhat when you zoom two steps ahead. When you zoom another step
ahead (and from there on until maximum zoom) there isn't any barrel distortion that would
bother me.
In the end, if I was trying to get the sharpest possible image, I wouldn't worry too much about what focal length / aperture setting to select for getting the maximum resolution, even if the photographic situation allowed me complete freedom of focal lenght and aperture. I would just select an aperture bigger than f/6 (say, f/2.8 - 5.9) and wouldn't shoot at the maximum tele end. I compare the sharpness and other image attributes to the Canon 30D DSLR later in the text.
Resolution at different focal lengths and apertures
^
In this part of the text (and the image below) we take a closer look at the sharpness differences.
Note: there is sometimes talk about sample variation of cameras, so you would do well take a relaxed attitude to pixel
peeping in these kind of tests (or actually, any kind...) These findings are for this particular camera, there could be some
minor difference
to other cameras.
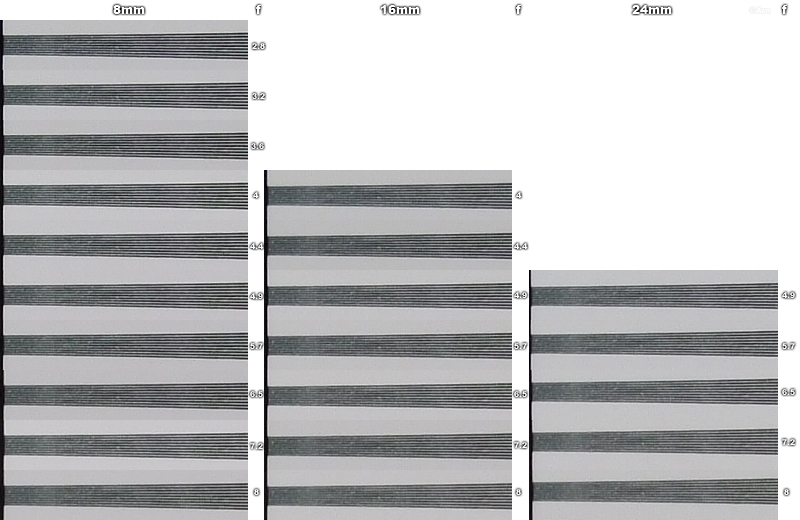
There is some slight 1-2 pixel difference in the magnification ratio of the crops. I don't think that this affects the results in a signifcant way. I did the resolution comparison several times with the different focal lenghts and the findings presented are constant findings. The mag X difference may be partly explainded by the little quirk that I came along: I noted that there were very small variations in the actual magnification ratio of a given focal length. When the lens was retracted to the body at power off and extended again at power on, the magnification seemed to be a little different. Possibly there is slight variation in the alignment of some lens elements. This didn't seem to affect image quality. I used a pretty heavy Manfrotto tripod (055ProB) with even a heavier 3-way head. Anyway, as I'm not doing this for money, I can't be bothered to re-shoot the images to have 100,00% match. You'll just have to trust me ;)
The resolution chart samples can not be used to compare the camera's resolution to any other cameras, just to compare the camera's performance at different ISOs and apertures. Three focal lengths were selected for comparison.
8mm: Difference in sharpness at apertures of f/2.8 to f6.5 is as minimal as to be insignificant. I would use below f/7.2 if given choise. sharpest aperture at center f/3.2 - f/3.6, sharpest aperture at corners f/3.6-f/f4. Corner sharpness doesn't really increase significantly using smaller wide-open apertures (something that usually happens with DSLRs)
16mm: sharpest aperture at center is f/4.9. At this focal length the corners come sharper when stoppging down to f/4.9 or f5.7. Softest aperture for corners is f/4 (softer than at f/8). Softest aperture for center is f/8.
24mm: sharpest aperture at center is f/4.9 (wide open). In the corners there is not that much difference.
Sharpest focal length (between 8/16mm/24mm) for center sharpness is 8mm i.e. wide angle. 24mm is softer in the corners than the other two focal lengths.
SUMMARY: 8mm is sharper than 16mm is sharper than 24mm. F/7.2 to f/8 are softest apertures. Other sharpness differences due aperture change are negligible.
Chrome color ^
Chrome color usually oversaturates. Not on all images, but on WAY too many to be used
frequently (or at all). I stay with Standard color.
Fringing ^
The blue/magenta fringing that appears sometimes, for example on back lit branches, might be better
defined by some expert whether it is purple fringing or CA. Nevertheless, often the Chromatic
Aberration removal feature of PTlens appears to be able to remove it very well, but then again,
sometimes it can not remove it and sometimes it removes it partially. So I guess it might be a
mixture of PF and CA. PTlens can also correct any barrel/pincushion distortion automatically
from F30 images. The fringing doesn't appear that often and isn't much of a bother, but when it
appears it can be quite visible (maybe in 1 to 5 pics in 100 visible enough to be truly
bothering with my shooting style and subject matter).
PT-lens homepage:
http://epaperpress.com/ptlens/

PTlens settings for fixing CA ^
On an image that actually needs correcting, I might use something like +0.0010 to +0.0030 on
the Blue - Yellow to correct blue shift. Notice that there may be shift on the Red - Cyan axel
too, so you might want to experiment with the fiqures as you detect different kinds of
fringing. Also note, that using the Chromatic aberration removal tool may slightly soften the
image AND/OR misalign the color channels, on other areas of the image, when you're
concentrating on reducing the fringing on some other part. So be sure not to reduce the image's
details while fixing the fringing! A way to avoid the softening, is of course to duplicate the
image before fixing CA and then, after running the plugin, mask other parts of the image that
don't have CA or PF.
Masking step-by-step in Photoshop: In Quickmask [Q] paint areas of the image with a Brush [B], press [Q] to leave Quickmask and Choose "Layer / Layer mask / Hide selection". You MUST have a duplicated the level for this to work.
Fixing purple fringing:
I've got Later in the text, in My post processing workflow
a Step-by-step Hue / saturation fix for PF in Photoshop.
Noise, ISOs and noise reduction ^
Noise reduction is always a compromise. It's not really *removing* noise, rather it's changing the appearance of noise
in the image to make the image look less objectionable to the human eye. And the compromise: the amount of detail in the
image vs how apparent the noise is. The more noise you smooth out, the less detail you'll be left with.
Even with removing some image information, the result may be well worth it. The processed (de-noised) image may
look more natural to the eye, because the digital noise tends to be "coarse" and more uneven than for example film noise.
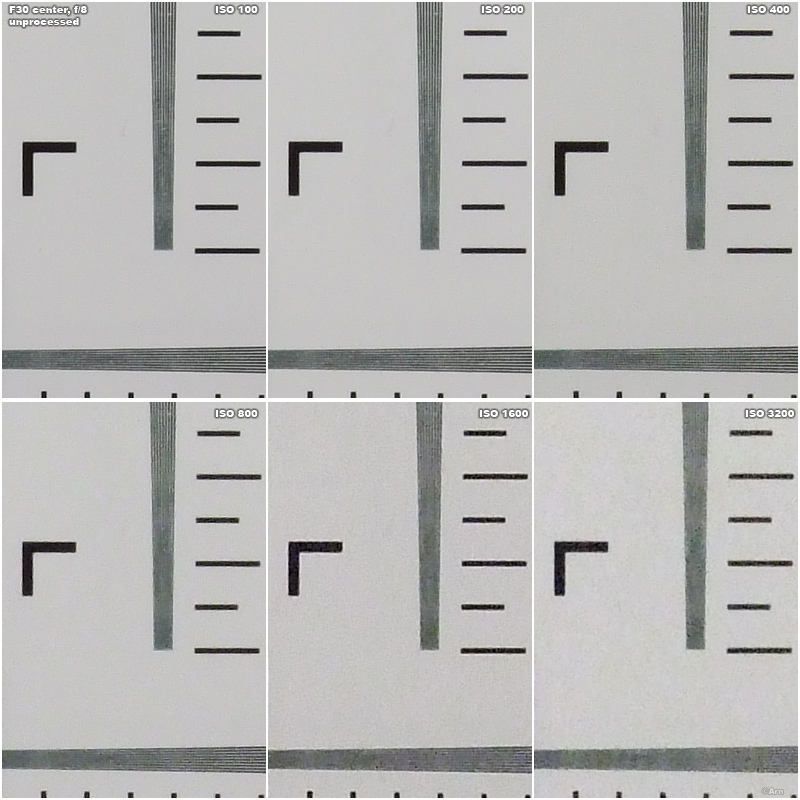
Digital noise is something, that many people can subconsciously detect as something extra in the image. Below is a resolution
chart shot with different ISOs to help determine how much loss of fine detail the noise and noise reduction of different
ISOs will cause. The chart comparison was shot at f/8. This was necessary due to the amount of light in the set up,
because otherwise I would not have been able to shoot at higher ISOs without extreme overexposure. Even now the
ISO3200 is a more exposed than the other shots, but not so much that you wouldn't be able to compare to the other ISOs.
In most cases, it's not a good idea to remove ALL perceivable noise. Overdone noise reduction will often make the image
look plastic and (even more) unnatural than the noise. Try to find a balance between noise and detail - enough noise removed
to make the image more natural, but enough detail (and noise) left, so that the image won't look too processed. Sometimes
it's OK to go for truly heavy noise reduction - that kind of images are the one's that don't have much fine detail to begin
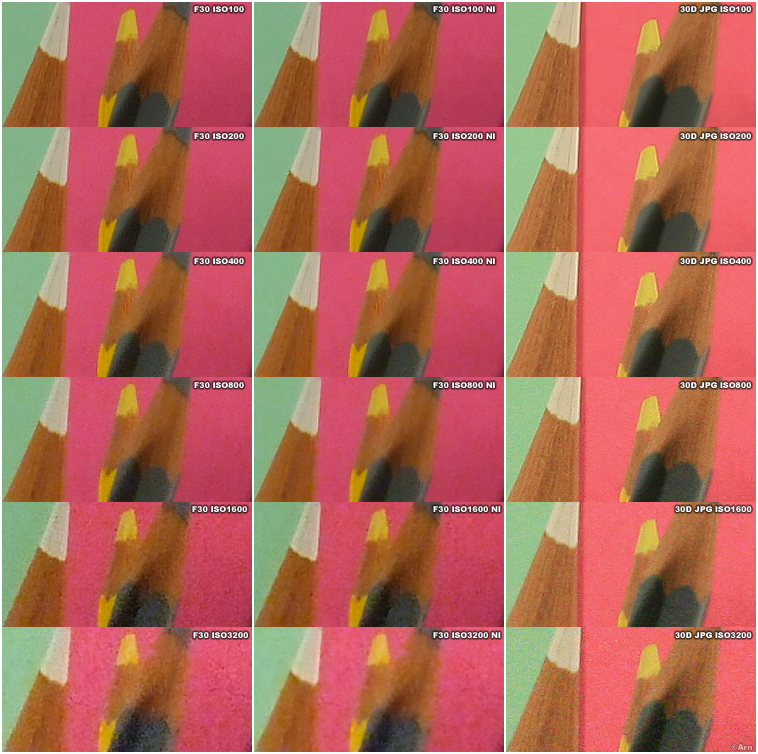
with, like images mostly containing skies/clouds/etc. The following crop demonstrates quite good detail preservation even at the
highest ISOs, probaly because the contrast of the fine detail is high. Noise removal with Neatimage also works pretty well here.
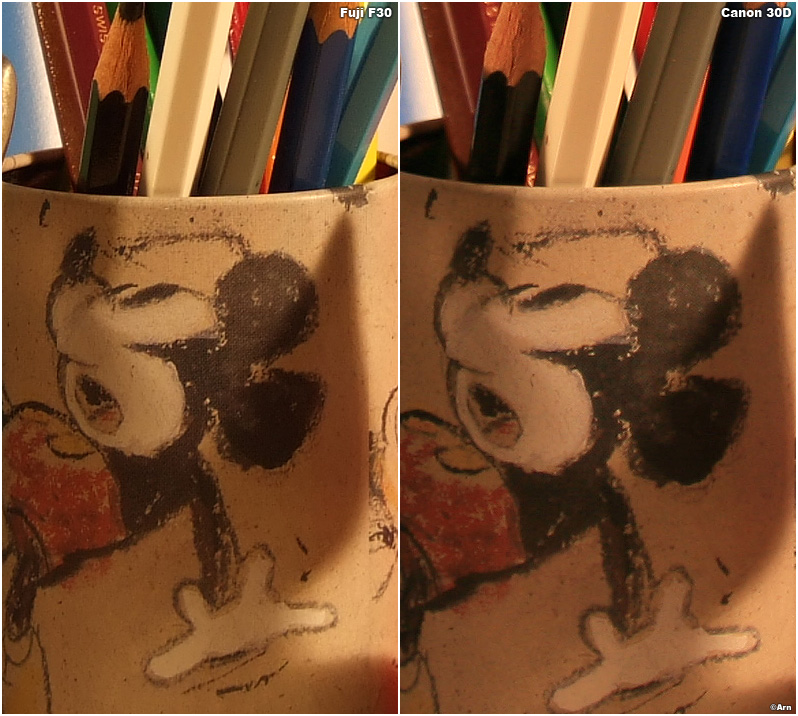
Look at the middle column for Neatimage (NI) processed crops. Crops from Canon 30D are on the right.
NOTE: in the following comparison images between F30 and Canon 30D, the Exif data found in the side-by-side crops can
be misleading, because the crops from the cameras have been pasted side by side to form one image - it is useless to read
the exif data from the crops with an Exif reader.

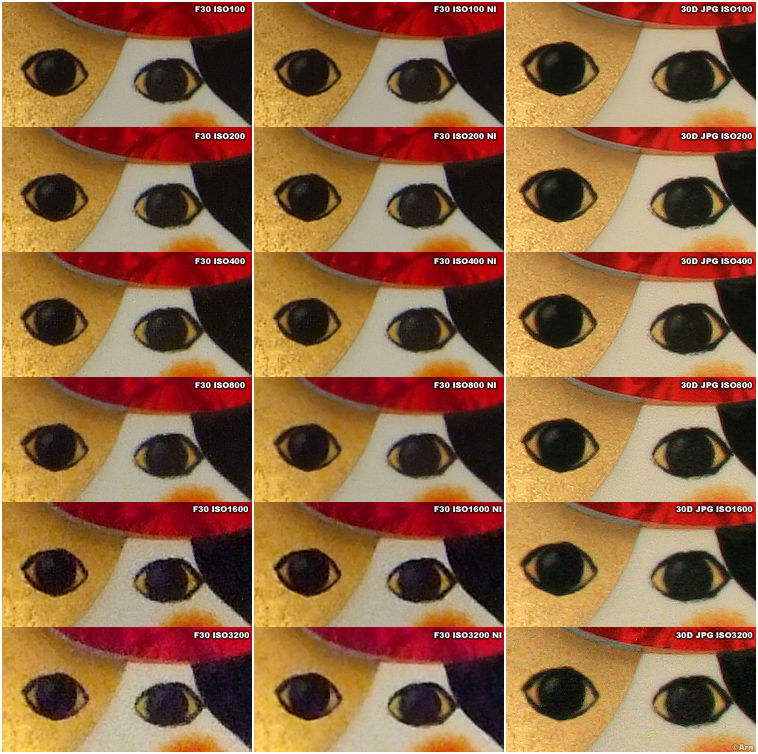
In the following sample detail is retained almost as well as in the last example, but the finest detail (scratches in the metal) are smeared on the higher ISOs.
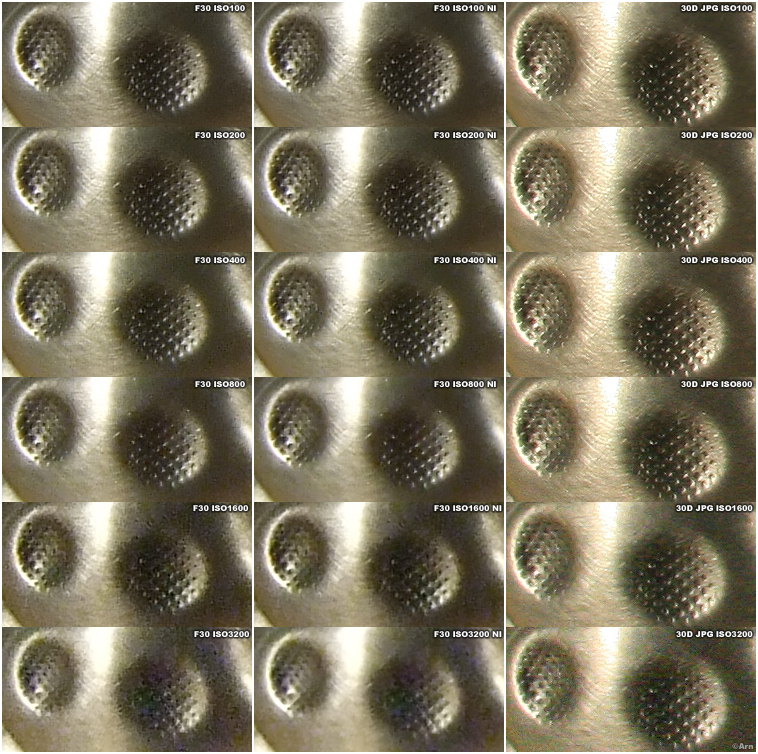
Just for fun, I compared the F30's noise performance to Canon 30D, too. In the comparison crops both cameras were shot using incandescent white balance and there was zero exposure correction. Canon was set to Matrix metering for exposure and the F30 for Average metering (more accurate metering for Fuji). F30 was shot at f/8 on all shots, Canon 30D was shot at f/16 on all shots. Canon was set to neutral Contrast and Saturation, +4 in-camera sharpening and in post processing before taking the crops a further USM sharpening of radius 0,3 and amount 250 to make the Canon images sharpening mach that of Fuji's.
Note that the next crop is taken from a high grain paper on the backround of the image and the actual texture in the paper is causing some of the variance in luminance.
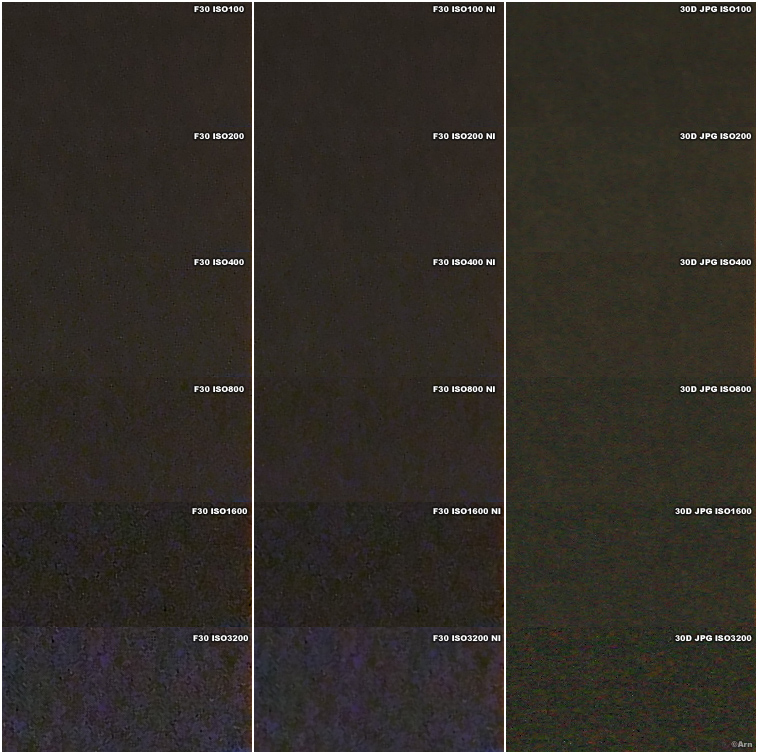
In the comparison crops, the 30D ended up slightly more sharpened than the F30 image, so this may increase the amount of apparent detail in the 30D crops. You can see slightly more halos in the 30D crops too. Remember that the 30D crops are presented completely for amusement/reference. The sensor the 30D is huge compared to the one in the F30, so there really isn't any way for the Fuji to reach the level of noise or detail of the 30D. And Canon DSLRs are the BEST performers in noise among DSLR bodies. Compared to any other DSLR brand, there would be even less difference (for example to some lower-end 6mp DSLR's). But I'm STILL amazed that the Fuji gets even this close. I could have many a 30x45 cm print done from an ISO 100-200 image of the F30, maybe even ISO 400 when the lighing is good enough (enought contrast and no need to underexpose) and no-one would ask if the image came from a compact camera or a DSLR. Of course, to some extent depending on subject matter of the photograph.
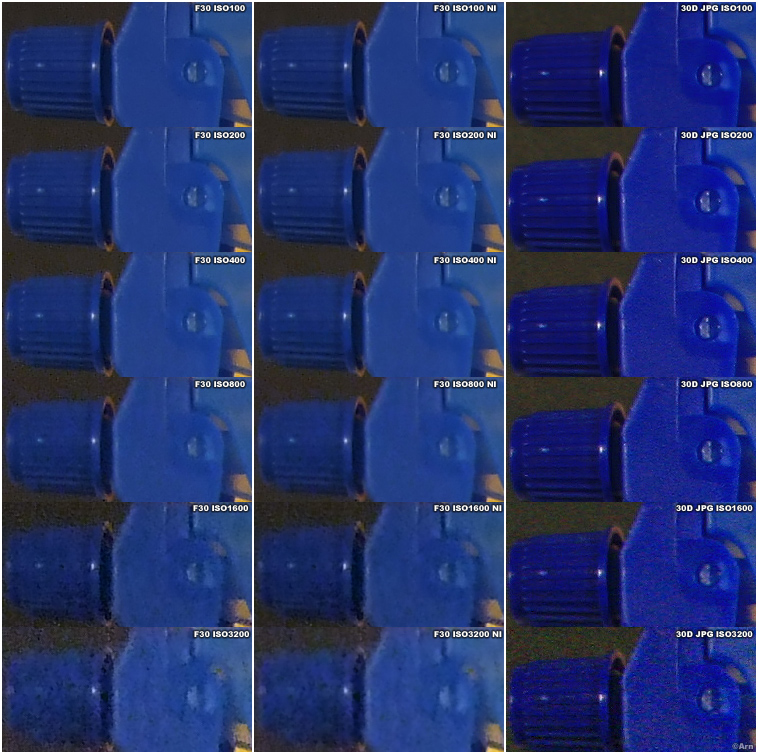
High ISO performance with low contrast scenes ^
As you can see from the crops, on different kind of subject matter the F30 fares better in terms of preserved detail
and suppressed noise than on others. It would appear that the camera will try to apply more noise removal on areas of
low contrast (and less detail). That's why (in the next image) the blue sprayer cap is so fuzzy - it's quite low in contrast.
If (for example) the light in the studio set up had fallen on the cap in a different angle, it would appear less fuzzy and
would have more detail. Just so you know how the noise reduction affects different areas of an image. In low contrast scenes the
built-in noise reduction of the F30 can't cope nearly as well as it does in removing the noise from high contrast scenes. Thus, detail
is removed along with the noise. It's the same with all compact cameras, when they try to deal with noise in low contrast images.
So, what the previous part actually means in real life? High-ISO overall performance in everyday use will be probably poorer than
these "studio" samples lead to presume. That is - in actual photographic situations, where you are forced to increase the ISO to get the
photo, the lighting is not often this directional / hard. I.e. small details will be less hilighted with light (contrast and the total
amount of light will be lower) and thus, noise reduction may blur the details more.
A small positive point is that, in regards to aperture used, the amount detail captured by the camera (in good lighting
conditions) might be slightly better than these samples leave to presume. This is because f/8 is the softest aperture available and will
give least detail (even though the difference in sharpness between various apertures is quite small). A larger aperture would have
rendered slightly more detail in the test target and thus, there would be more detail in the high ISOs too (it would be easier for the
camera's noise reduction algorithm to separate detail from noise). But compared to the effect of light and contrast on details preserved
by the noise reduction algorithm, the difference will be miniscule.
To my eye, when going from ISO 1600 to 3200, the decrease in detail and increase in noise is perhaps bigger than between other sensitivities (or maybe it just steps over some sort of visual threshold), so I'd rather not use the ISO 3200 if I can avoid it. But even the ISO 3200 is more usable than I would ever have thought. Taking a pic at ISO 3200 is still a lot better than not getting the pic at all. I believe that there is perhaps nothing else that renders photographs so easily unusable as camera shake does.
About some scene modes ^
Just about all of the scene modes seem to select higher ISO modes more easily than the M-mode.
For a user trying to achieve the very best image quality this is not a good thing. On the other
hand, it is probably a wise move from Fuji, considering the average scene mode user, as the
higher ISO's will result in less images blurred by shaking of the camera and the extra noise
won't show in a 10x15 print or screen size. Experienced users (or all people with steady hands / basic knowledge of shooting
with a camera) should use the Auto, M-mode or Aperture priority (A/S-mode) instead of the scene modes. Except when you need to
take exposures longer than 3 seconds, then you have to use the Night Scene mode. Just remember to select from the
Setup menu Long exposure: ON.
Scene mode: text
Increases sharpnening to a high level and increases contrast. Also looks like it might increase
saturation. Unsuable for anything but photographing text (and I might not use it for even that)
Scene mode: portrait
Portrait Scene mode seems to have a different tone curve from ordinary modes. There is a little
less contrast - highlight detail is saved a little better compared to non-scene modes and the
shadows seem to be lighter. Based on the exposure values, the Portrait mode seems to be
applying negative exposure correction to the images (shorter exposures/smaller aperture). This
would lead to a conclusion, that the in-camera postprocessing applies a curve that lightens the
shadows somewhat and leaves the hilights with a flatter contrast. However, there are some
stupid side-effects to the portrait mode:
Portrait mode raises the ISO unneccessarily quickly to ISO200 (or to ISO 400 if you're
already at ISO200 and so on). Even when the shutter speed was 1/200 in M-mode @ wide angle and
ISO100, when switching to Portrait Scene mode the camera raised the ISO to 200 (while keeping
shutter speed even higher). If the Portrait mode was trying to keep as large aperture as
possible (as it should) the effect should be the opposite - it should switch later to the next
higher ISO. It is also impossible to make -/+ exposure corrections. This pretty much renders
the portrait mode unusable for the experienced and more demanding user. In many situations
blown hilights may be more easily avoided by selecting M/A mode and dialing negative exposure
correction.
Scene mode: landscape
This mode oversaturates the image and increases contrast. It also tends to select a smaller
aperture than M-mode does. This will also result in the Landscape mode selecting a higher ISO
setting earlier than the M-mode. I will not use the landscape mode for any purposes.
Compared to a DSLR: F30 vs Canon 30D ^
To put all this into perspective, I compared the still life set up of the F30 to Canon 30D (8mp DSLR) at ISO 100.
Other ISOs were compared in the Noise
section of this text. Canon of course wins big time with the higher ISOs, but at ISO 100 there is remarkably little
difference, when comparing unprocessed JPGs. The idea here is to compare the two cameras in
carry-around, Point & Shoot use - when you want good images fast and easy. That's why the Canon
was set to shoot a high quality JPG instead of RAW (which could be fine tuned for hours in a
RAW conversion program). Below you can see how the scene was framed for the cameras. Note the difference in aspect ratio.
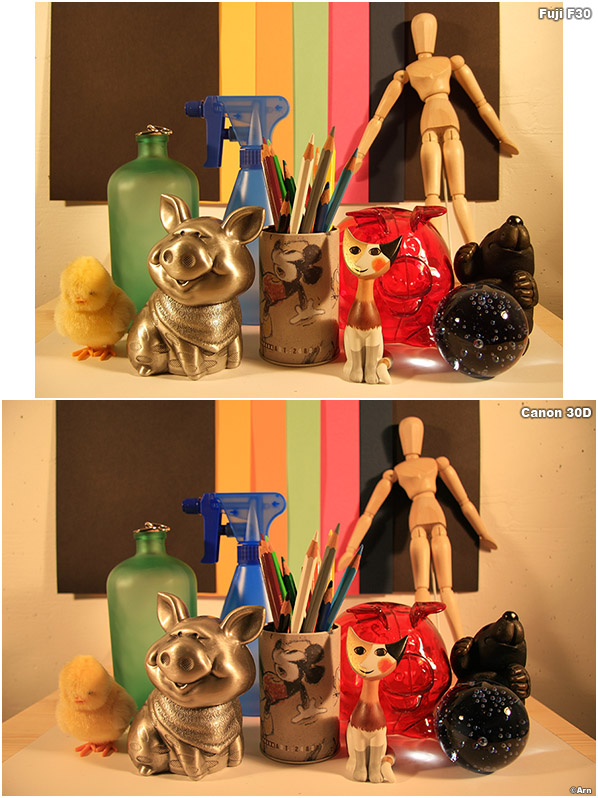
Lens settings
Both cameras were shot wide open (largest aperture) for the focal length. The lens for the
Canon was a 17-85 IS lens (the focal length range of the F30 is covered and a 50mm prime
wouldn't just be fair). The focal lenght of the Canon was set to match the focal length of F30
at wide angle - approximately 36mm equivalent.
other settings
Both cameras were set to ISO 100. No exposure correction on either camera and Pattern metering
on both. Cameras were (of course) set on a sturdy tripod. Self timer was used for taking the
shots and Mirror lock up for the DSLR. I took several shots. Canon had neutral Contrast and
saturation settings. Medium setting (4) was used for in-camera sharpening for Canon. As an
after thought, I might have higher values in the Canon for Contrast / Saturation instead of
neutral and maybe maximum in-camera sharpening, but for now, I have only this comparison to
display, with the neutral settings. Both cameras were placed on Auto White Balance.
Post processing
None was done, except I sharpened the Canon 30D file further (on top of the slight in-camera sharpening) with USM
radius 0,3 and amount 250 to match the in-camera sharpening of the Fuji (yes, compact cameras
DO use that much more sharpening compared to out-of-camera DSLR files).
Results: F30 vs Canon 30D ^
The first thing that strikes the eye, is that Fuji F30 has better White Balance for the Auto
White balance setting. Not bad for a camera that is 1600� cheaper. Fuji has more contrast, and
SLIGHTLY more cut hilights, but the difference is so small as to be insignificant. The pattern
metering of Fuji has exposed the image slighly more than Canon has, this also affected the
cutting of the hilights. Shutter speed for Fuji was 1/170 @ f/2.8 and for Canon 1/125 @ f/4.
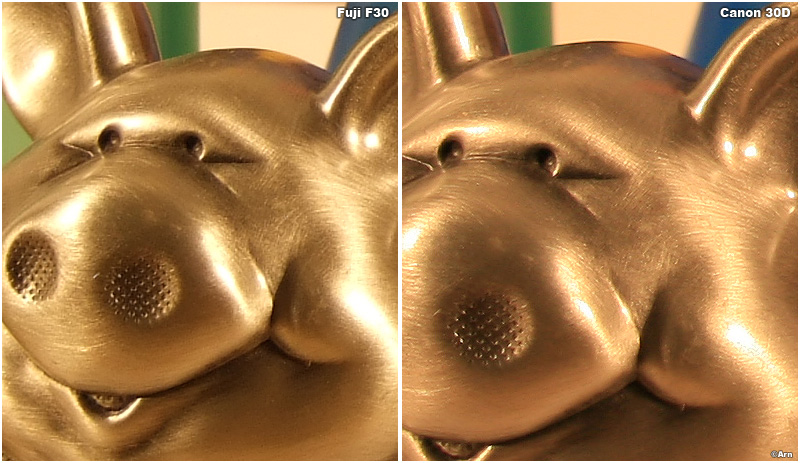
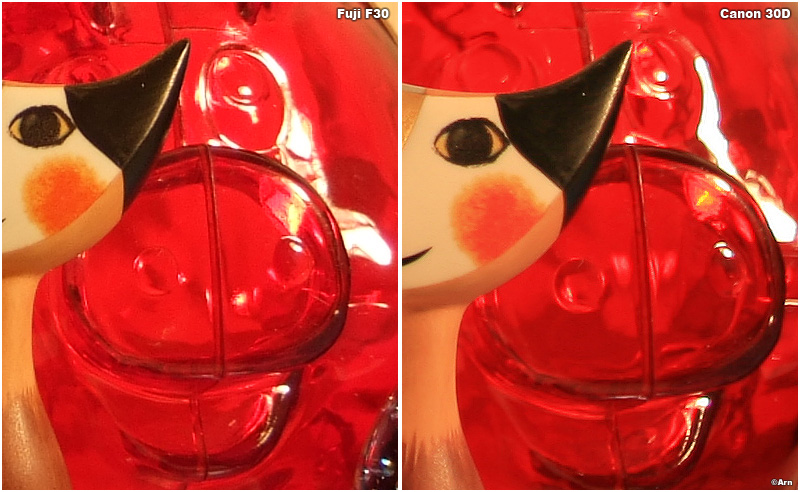
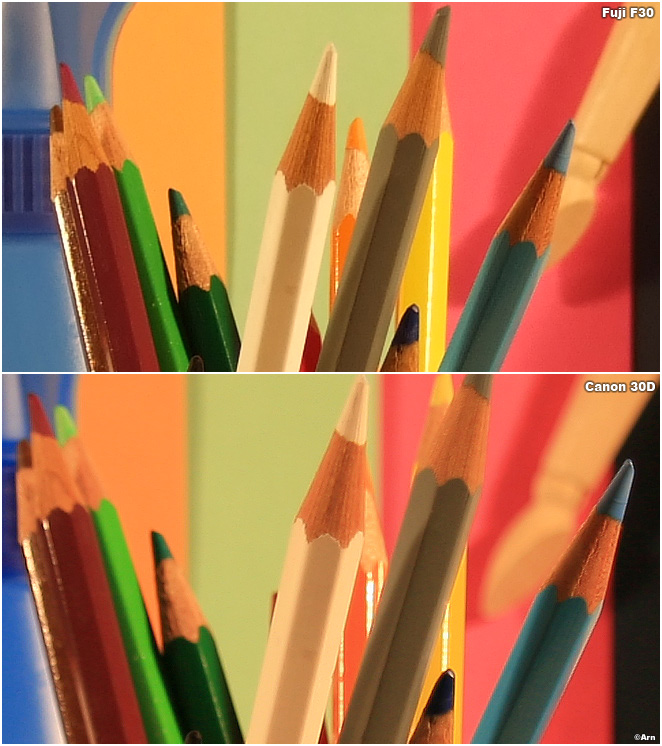
In the end, sharpness and noise were close enough that I think I could print to at least 30cmx45cm without anyone wondering whether the pic came from a 2000� DSLR (lens included in price) or a 350� pocket camera.

The DSLR had less clipping in shadows and highlights but (surprisingly) there's not that much difference in general image quality at
ISO 100. That was the case at least in this particular still life test image. When using higher ISOs, the situation drastically changes
and Canon of course dominates at higher ISOs - that's just about the forte of Canon DSLRs.
For curious people, here's an ISO 3200 pic taken with a Canon 20D @ f/1.8 - the softest aperture on the 50mm f/1.8 lens.
It was very dim when the pic was taken. The image is resized 50%. The image was shot handheld at 1/30s. If I (could have) used
a smaller aperture like f/2.4 and I'd had more light for a faster shutter speed the image would significantly sharper.
https://pbase.com/arn/image/47681482
What's in favor of the DSLR? ^
Well, a lot of things obviously.
One of the most important differences (at least to me) between the cameras in favor of the
DSLR, is that the 30D has a more freedom with exposures and shooting conditions and a vast
amount of post processing leeway compared to the F30. The 30D can be used at ISO 1600 without
hesitation, removing excessive color noise in a RAW conversion program without affecting the
details really at all. Luminance noise is of course another kind of beast to remove, but Canon
DSLRs don't have much of it to begin with. The 30D is better in all aspects of image quality (with a good lens, of course!) and the jpg
image quality is clearly better when usin ISO 200 and higher. When using jpg (not RAW) and ISO 100, the difference to Fuji F30 in
sharpness, dynamic range and noise is small for practical purposes. The scales are tilted, when the lighting is flat, though. The noise
starts to show earlier in the Fuji F30 images when the lighting is flat or when the image is underexposed. Exposure correction, levels,
curves and other such tweaks to an image don't bring noise nearly as much to the DSLR image as it does to the F30.
When a DSLR file has a wrong White balance, it can be changed easily in the RAW processing program and exposure can be adjusted. Blown
hilights can be saved to some extent and underexposed areas of an image more easily lifted. Then there's lenses
and external flashes and so on and so on. All that stuff that makes your camera bag weigh 15kg instead of 200 grams.
in favor of a compact camera (F30) ^
The bad thing about that freedom with the DSLR is that I HAVE to do all that post processing if I use RAW files :)
Shooting with a compact camera can be a lot more careless and more fun than the DSLR. No sore
necks from carrying the camera & lens(es) all day, no people staring at your camera. A compact
camera can be swiftly pulled from a pocket - [snap] - the picture taken and slip the camera
back in to the pocket. I sure as hell can't fit the 30D with a lens attached in to any kind of
pocket of ANY of my garments that I have EVER owned! :D A compact camera is more discreet, light,
fast and easy to use.
One thing that was clearly better in the F30 was corner sharpness at wide angle focal lengths. My F30 is sharp in the corners
at all focal lengths, but my Canon 17-85 is noticeably softer in corners compared to center at about 20-30mm.
Many cheaper zoom lenses (for example those costing as much as the F30 or less) will probably have noticeable corner softness at some
focal lenghts.
compared to the Fuji F50 ^
I am updating this article with a comparison to the Fuji F50, because people have been extremely interested about the differences in image quality. As I don't have access to the Fuji F50, I went to the www.imaging-resource.com review site and analyzed their test images of
the F30 and F50 in a side by side comparison. At the moment their F50 review isn't ready, but they have the test shots available. For
copyright reasons I will not (of course) present any of the images or crops here, if you wan't to see them, you will have to go the the
imaging-resource site (links to follow later). I have to say, that this site has always been very high quality, neutral and informative
and I can only highly recommend it to anyone interested in seeking the very best camera reviews (or SLR lens reviews on the sibling site
www.slrgear.com)
I downloaded the F50 and F30 images from Imaging Resource and compared them side by side at full resolution and after resizing F50
images to 6MP (bicubic). I will present analysis of the images from ISO 3200 downwards. The F50 has the (3MP) ISO 6400 mode, which the
F30 lacks - it is horrible in image quality, but may be convenient in some circumstances.
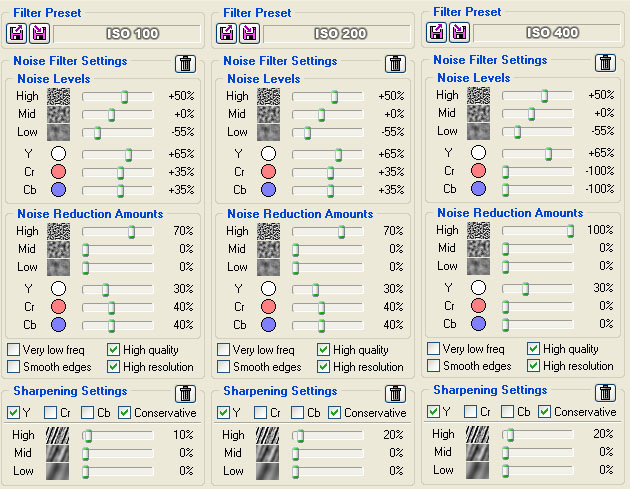
My post processing workflow (in order of execution)
^
1) Noise control (Neatimage)
Run the image through Neatimage, if ISO 200 or higher. 95% of ISO 100 images don't need NI,
which is amazing for a camera of this size. And it only takes 30 seconds when you know what
you're doing (auto match a profile for Fuji F30 and select an appropriate filter preset that
you only have to do once for lower ISO's and maybe another one for the higher ISO's). If your
really picky (like me) just use that 10 minutes to fine tune a filter preset for every ISO. I
recommend selecting 200% magnification when previewing the effect of neatimage while making
adjustments to the filter preset.
http://www.neatimage.com/
Later in the text, after this chapter concerning post processing work flow are my
current settings for Neatimage
2) optical distortion fix (mostly on wide angle images)
Use PTlens for correcting barrel / pincushion distortion (if any). Sometimes minor barrel
distortion at wide angle. Running PTlens on an image for optical distortion takes less than 10
seconds.
PT-lens homepage:
http://epaperpress.com/ptlens/
2b) fringing fix (maybe 1-5% of images)
Occasional CA fix with PTlens too. If there is any PF (fringing that PTlens can't handle), I
fix it with a "Hue / saturation" layer, darkening and desaturating parts of the image that have
blue/ magenta fringing.
Step-by-step Hue / saturation PF fix in Photoshop:
- Go to quick mask mode press [Q]
- With a Brush [B] of appropriate size, paint areas of the image that have purple fringing
-create a "Hue / saturation" layer
- select Edit: Blues or Magentas from the pull down menu
- click on a part of image that has the color fringing, this will adjust the position of the
sliders to a correct position. After that, you can adjust the more accurately by hand if you
want to.
- I usually dial a negative value for lightness and
- negative value for saturation
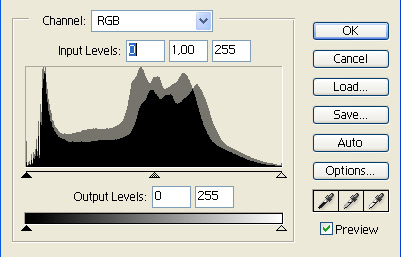
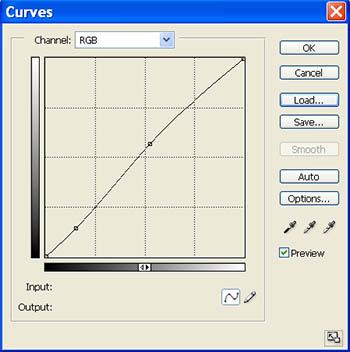
3) Levels (on 90% of images) for contrast adjustment and white balance fixing.
My Neatimage settings for noise reduction ^
These Neatimage settings are optimized for getting smooth results - removing
uneven noise and those distracting speckles that are the side effects of the
in-camera noise reduction. These settings procuduce smooth and even edges. A
little detail is inevitably lost, when reducing noise with the "high" setting, but
the idea is that the end result is still more eye pleasing and natural than the
original.
The noise that is present in F30 high ISO images is in fact high (to my eye)
frequency noise (small grain) and so it is most efficiently removed using the
"high" reduction. Reducing high frequency noise shouldn't even be so detrimental to
detail as you might think, because neatimage should be trying to determine with
the camera profile what high frequency information is noise and what is detail!
F30 images don't have much chroma noise at all, so I don't remove it from the
images. I haven't really seen any practical benefit from using noise from the
color channels. On other cameras, notably on my DSLR I remove MOSTLY chroma noise!
At some high ISO settings I apply less noise reduction than on some lower ISO
settings - this is to preserve detail. At ISO 1600 for example, the noise
reduction eats away too much detail if I use the settings that I use for ISO 800.
It is always a matter of taste and personal preference what kind of post processing you want in your images.
Therefore, if these settings don't look like they produce the kind of images YOU prefer,
them only as a starting point for your own noise reduction with Neatimage and Fuji F30.
These are settings that suit MY preference at the moment (the kind of balance between detail and noise that I like).
If you want smoother images (and less detail) or more detail and less noise reduction - change
the settings accordingly and experiment. It is probable that these settings may be
further optimized - if you find settings that preserve more detail and still
reduce more noise, let me know!

B&W conversion in post processing ^
I use almost always the Channel mixer for turning into b&w, because that way I get to decide
how much brightness differently colored areas of the image will have and have the most control
over the final image. I also use Hue / Saturation before the b&w conversion to modify the
image. There are plenty of good tutorials on the net abot B&W conversion, so I won't go in to
more details here, but just try this:
1) - make a Hue / Saturation layer, with neutral settings (no change)
2) - make a Channel mixer layer (monochrome) with starting values of 33% in each value
3) -> then, adjust the 'Hue' slider in the Hue / Saturation layer and see it's effects on the image
----> note: the Hue / saturation layer needs to be below the Channel mixer layer for this to work.
4) (optional) -> you can also try varying the amount in the Output Channels of the Channel mixer layer
-> It's THAT easy!
Fuji F30 image gallery: ^
https://pbase.com/arn/pictures_on_the_go_2
 |
| comment | share |
| Joe | 03-Oct-2012 21:50 | |
| Arn | 03-Oct-2012 17:19 | |
| Joe | 02-Oct-2012 23:40 | |
| Arn | 26-May-2009 14:45 | |
| Alan | 25-May-2009 13:18 | |
| Arn | 04-Oct-2008 09:10 | |
| Torsten | 28-Sep-2008 22:42 | |
| Arn | 24-Sep-2008 19:12 | |
| Guest | 23-Sep-2008 23:12 | |
| Friedrich | 12-Sep-2008 23:37 | |
| Guest | 29-Jul-2008 16:13 | |
| Arn | 08-Jun-2008 17:55 | |
| Guest | 16-May-2008 04:25 | |
| Arn | 09-Mar-2008 15:53 | |
| Michel Fleury | 09-Mar-2008 15:36 | |
| Arn | 31-Jan-2008 11:40 | |
| Christoph | 30-Jan-2008 16:16 | |
| Arn | 28-Jan-2008 17:35 | |
| Guest | 27-Jan-2008 15:16 | |
| Christoph | 27-Jan-2008 14:07 | |
| Guest | 27-Jan-2008 12:56 | |
| Guest | 01-Jan-2008 00:10 | |
| Arn | 06-Aug-2007 17:06 | |
| paul thompson | 03-Aug-2007 17:49 | |
| Arn | 23-Jul-2007 06:20 | |
| daleq | 22-Jul-2007 22:42 | |
| Arn | 17-Jun-2007 19:22 | |
| Arn | 17-Jun-2007 16:43 | |
| lplp | 17-Jun-2007 13:36 | |
| Arn | 21-May-2007 19:32 | |
| Humbert | 21-May-2007 09:49 | |
| Robert Soen | 18-May-2007 20:05 | |
| Robert | 18-May-2007 11:18 | |
| Arn | 09-May-2007 06:50 | |
| Frank P | 09-May-2007 06:16 | |
| Kevin Y | 22-Apr-2007 16:01 | |
| Robert Deutsch | 19-Apr-2007 12:43 | |
| Guest | 11-Apr-2007 13:34 | |
| Viktoria | 29-Mar-2007 09:16 | |
| ajay | 16-Mar-2007 04:35 | |
| augi | 07-Mar-2007 21:09 | |
| GoodListener | 04-Mar-2007 18:45 | |
| GoodListener | 04-Mar-2007 18:39 | |
| Guest | 02-Mar-2007 04:17 | |
| Arn | 03-Feb-2007 23:18 | |
| Guest | 03-Feb-2007 22:43 | |
| Kevin M | 19-Jan-2007 23:23 | |
| Guest | 17-Jan-2007 04:37 | |
| Chris | 05-Jan-2007 05:15 | |
| Arn | 04-Jan-2007 23:34 | |
| Bill | 04-Jan-2007 23:10 | |
| Guest | 24-Dec-2006 02:07 | |
| Guest | 03-Dec-2006 21:51 | |
| Matt | 27-Oct-2006 15:37 | |
| guest | 25-Oct-2006 22:56 | |
| edmund | 25-Sep-2006 17:45 | |
| Zach | 24-Sep-2006 21:11 | |
| Zach | 24-Sep-2006 17:50 | |
| Arn | 20-Sep-2006 18:15 | |
| dsi0743 | 20-Sep-2006 15:32 | |
| Arn | 08-Sep-2006 16:45 | |
| Guest | 08-Sep-2006 05:35 | |
| Guest | 30-Aug-2006 23:28 | |
| Oscar Jackson | 21-Aug-2006 04:46 | |
| Guest | 16-Aug-2006 07:10 | |
| Isabel Cutler | 04-Aug-2006 22:36 | |
| Arn | 04-Aug-2006 21:46 | |
| Stephane | 04-Aug-2006 12:42 | |
| Landaree | 03-Aug-2006 19:37 | |
| sYsIphe | 02-Aug-2006 21:01 | |
| Smokey | 29-Jul-2006 16:36 | |
| Rick Sterling | 29-Jul-2006 14:23 | |
| Guest | 29-Jul-2006 09:21 | |
| roberta | 29-Jul-2006 05:27 | |