There’s a lot of advice available on the camera and lens(es) to buy for wildlife photography, but it can be an expensive process! As a result I’ve decided to document the equipment that I use and a bit about how I use it. If you’ve any questions that you’d like to ask about this article please feel free to contact me via my profile.
Background
I first took an interest in wildlife photography in the 1970s and quickly discovered that it was a great way to spoil a day out bird watching. As well as another thing to carry, in this case a brute of a Zenit B plus a rather slow 300 mm lens, I just found that the priorities of bird watching (or perhaps more accurately bird spotting) and photography didn’t match.
While the conflict still exists the gear got better and so did the bank balance. Having spent a year Digiscoping with a Leica APO Televid 77 and a Nikon CP 4500, I finally made the move to a D100 DSLR in 2003 and then a D2X in late 2005. As my wife kindly put it “if you’re going to buy a new camera go for a professional build.”.
Of course the question is then the lenses to go with this setup and when & how they are used. I can’t recommend the Bjorn Rorslett web site ( http://www.naturfotograf.com/index2_PC.html) highly enough on the question of equipment reviews and in particular the sweet points of the particular lenses. He’s been my main reference for Nikon lens purchasing decisions, and in one case provided a view on a lens that I was struggling to find much information on.
Equipment
Nikon D2X. It’s the colour that I notice the most with the D2X, a huge step difference from my D100 and of an overall quality that deserves the best lens glass that you can afford. My standard D2X settings are Image Quality RAW, RAW Compression OFF, Colour Space ADOBE, Colour Mode II, Tone Compensation AUTOMATIC (although I have recently been experimenting with the higher contrast setting and rather like the results, particularly when employed with a polarizing filter), Image Sharpening OFF, Hue Adjustment 0, ISO 100, Long Exposure Noise Reduction OFF, High ISO Noise Reduction OFF, Exposure Delay Mode ON, White Balance PRESET, AFC Mode Priority FOCUS, AFS Priority Select FOCUS, Group Dynamic AF Centre Area Pattern 1, Lock On ON, AF Activation ON. I use a Kodak Grey Card to accurately determine colour temperature before shooting, but when this can’t be done I’ll subsequently photograph the Grey Card in order to check for any colour casts. If I find any I’ll fix them subsequently using Photoshop CS Curves, but my goal is to minimise post processing by getting everything right at the start – just as if I’m working with film.
Gitzo G1325 Mark 2 Tripod. This is a carbon fibre tripod, a distinct advantage on a cold day in Scotland, that I’ve found sturdy enough for all my lenses up to and including my 500mm f/4. I use three different heads with this tripod, namely a Wimberley Gimble Head (version 1) with the 500mm lens, a Manfrotto 128RC video head for low to the ground macro work & landscapes, and a Manfrotto 222 quick lock head for everything else. I believe that a tripod is an essential component in obtaining image sharpness and as a result I tend to use one, along with my MC30 remote release cable, for all of my serious work,
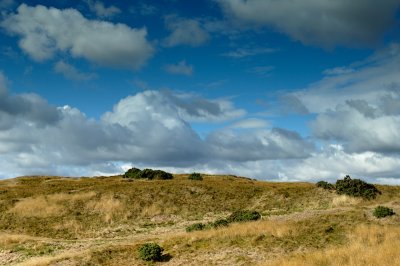
Nikkor 35mm f/1.4. This is my general purpose landscape/scene/geology lens. I seriously considered 28mm as a focal length option, but this old manual focus, non-cpu lens produces superb quality images on the D2X – particularly at about f/4. I do find that I need to set exposure compensation to -0.3 with this lens to avoid burnt out highlights and I’ve even compensated down to -1.0 for a wedding on a sunny day. In this case the mid tones still came through strongly despite the exposure compensation and I was able to use the photographs without any subsequent contrast adjustment. The landscape results are variable, depending on how cluttered the landscape is and the results of subsequent resizing in Photoshop, it does make me think again about for film for landscapes.
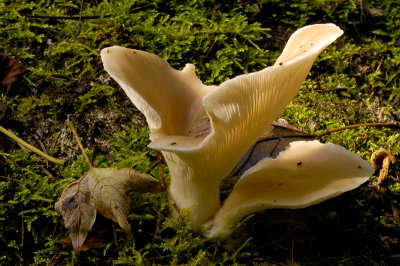
Micro-Nikkor 105mm f/2.8. I use this as my main plant and fungi lens. I also use it for insect photography if I end up taking hand held snaps while on holiday or out doing field work. Again this is a manual focus, non-cpu lens, but the image quality with the D2X is excellent, particularly in the f/8 to f/16 range and arguably to f/22. As with my other non-cpu lens I find that an exposure compensation of -0.3 is a good idea, particularly in bright conditions.
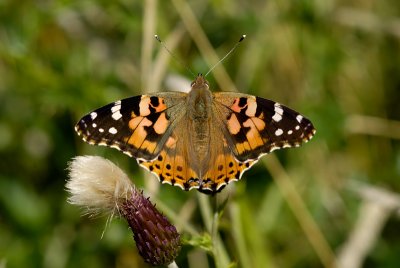
AF Micro-Nikkor 200mm f/4 D ED. An auto-focus lens but one that I use all the time set to manual focus for macro work. This lens has the reach for photographing small insects in the field, but a tripod is an absolute must for sharp results. It produces good quality images with the D2X, but I always have to beware of cranking up the f-stops too much in order to compensate for depth of field limitations. I try to avoid pushing beyond f/16 with this lens but have succumbed to higher f-stops on occasion. Using f/22 is still ok, but the higher the f-stop the poorer the image contrast and the more Levels adjustment needed in subsequent Photoshop CS processing. I guess what I’m saying here is that just because the lens stops down to f/36 don’t expect the image to look as neat as it would at f/8. This is a cpu lens and I’ve never needed to set any exposure compensation while using it.
AF-S VR-Nikkor 70-200mm f/2.8 G ED. This is a good lens for photographing confiding birds, for example on the Farne Islands, and for close range flight photography in general. It performs well even at f/2.8, but I’ve most often used it stopped down to f/4 to maximise the image quality. Another cpu lens that doesn’t normally need any exposure compensation applied. Used a lot with my D100 it still hasn’t been used much with the D2X.
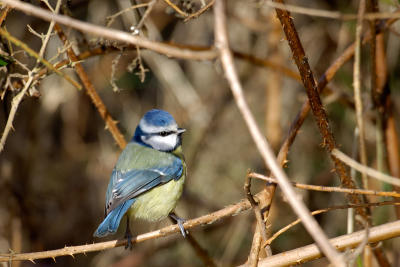
AF-I Nikkor ED 500mm f/4 D IF. This is my lens for photographing small birds, wildfowl and wader from a fixed or portable hide. The AF-I refers to the fact that its auto-focus is internal, making it about 10 years old at the time of writing. Nonetheless it is good glass, if not as wizzy or expensive as the AF-S 500mm, and produces good results on the D2X at an aperture setting of f/5.6 and an exposure compensation of -0.7.
Post processing
I usually find that I can discount any obviously duff images by simply reviewing them on the camera LCD screen, but following this I check the image quality and select the ones to keep by reviewing the RAW files in Nikon View.
All of my subsequent processing takes place in Adobe Photoshop CS, opening the RAW files using the plug-in that came with the Nikon software.
After opening the RAW file my first step is Digital High Resolution Sharpening using the Photokit Sharpener plug-in. What type of sharpening I apply depends on the subject, but to date I normally apply Narrow Edge Sharpening for wildlife subjects.
The next step is to look at Levels and ensure that I’ve got good image contrast, if necessary I’ll adjust the black point and the white point sliders as needed.
While Nikon recommend Colour Mode III for wildlife the tests I’ve carried out suggest that I’ll get results closer to life if I use Colour Mode II and boost the Colour Saturation in Photoshop CS. I never alter this much, +4 Colour Saturation is a typical value, just enough to notice the difference on the screen.
At this point the image is ready to be sized for its final output, after which I apply the appropriate Photokit Sharpener Output Sharpener. I’ll typically produce a 1024 wide image for subsequent slide shows, 800 wide for the Internet, and a 6” x 4” 480 Glossy Fine for my photo album.
JPEGS for the Internet are converted to the sRGB IEC61966-2.1 profile before download, prints are made onto Epson Premium Glossy Photo Paper using their R800 printer and the appropriate printer-paper profile.
I take two backup copies onto CD of my RAW files before finally deleting them from the camera memory card.