This blog breaks down the different parts, definitions and thread components of seacocks and thru-hulls. It also takes some eye opening measurements of a bronze thru-hulls actual thickness.
This item is called a thru-hull or sometimes a "mushroom head". They are straight threaded (NPS thread) so they can be cut to the correct length for your hulls thickness and then be threaded into a female straight threaded seacock or a flanged adapter. The one on the right has already been cut to length. Most all thru-huls installed into proper seacocks will need to be cut to the proper length.
When installing them with a proper seacock the nuts are not used.
*AS ALWAYS CLICK ON ANY PHOTO TO MAKE IT BIGGER
22-FEB-2008
Preferred & Non-Preferred Installations
The example on the left side of the photo is the preferred method for installing a proper seacock. The preferred method includes a wide base flange for strength and the ability to through-bolt or screw the flange to the boat.
The example on the right side of the photo is the non-preferred method of installation and has a number of down falls.
The most obvious weakness is the fact that there is nothing to keep the thru-hull from possibly twisting when turning the handle to open of close the valve. The only thing holding this thru-hull to the boat is some marine sealant and that very small lock nut. The second issue, is not so obvious, but, still just as scary. A thru-hull fitting is NPS or straight thread and the bronze ball valve is NPT or tapered thread. This installation can cause an improper mismatching of thread types which you will read about bellow.
The third major issue is strength. Simply threading a ball valve onto a thru-hull fitting, without a flange, creates a weak point in which the thru-hull could possibly snap off or break if anything substantial were to hit it in rough seas. A mishap like this happened to me when a spare alternator fell off a shelf in rough weather and cracked my thru-hull fitting. This is part of the reason I wrote the blog about installing proper seacocks and this primer to show why to do it the right way.
Why Is It a Bad Idea ?
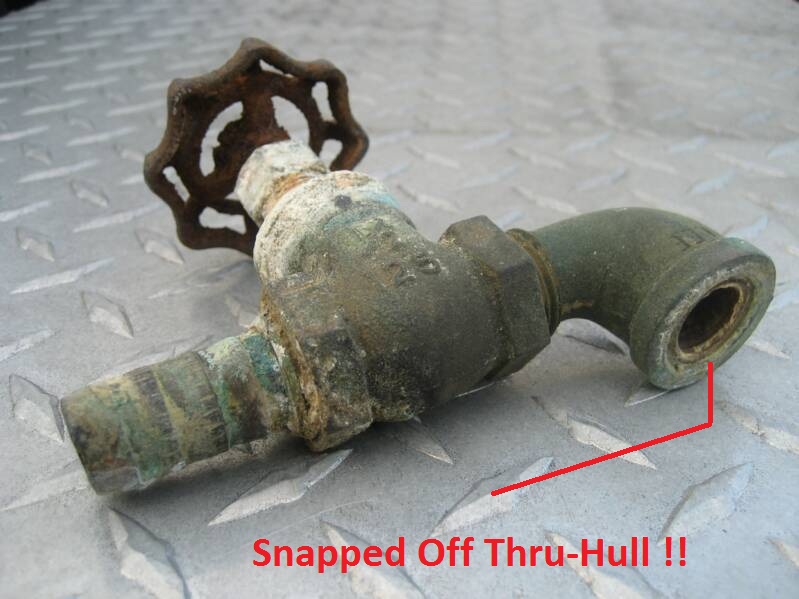
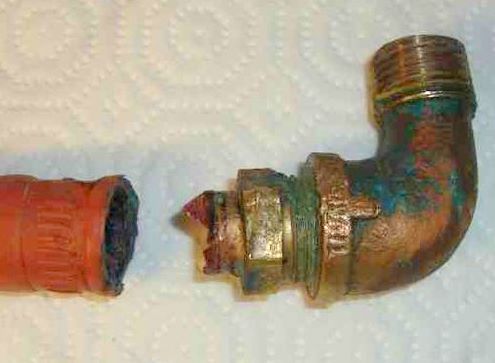
This photo is a picture of a US production sailboat seacock assembly as shipped from the factory. While this builder no longer uses gate valves they still, to this day, install seacocks using this same method.
This owner simply wanted to remove the gate valve and replace it. When a slight pressure was applied, not even enough to break the threads free, or spin the thru-hull in the hull, the thru-hull snapped off and he was left holding the valve assembly in his hands. WOW!!!!!
This owner installed through bolted "proper" flanged seacocks. This could happen to anyone with this type of installation and this owner is just lucky it did not happen while off sailing.
If you look close you can still see the broken thru-hull still in the bronze elbow..
11-JAN-2008
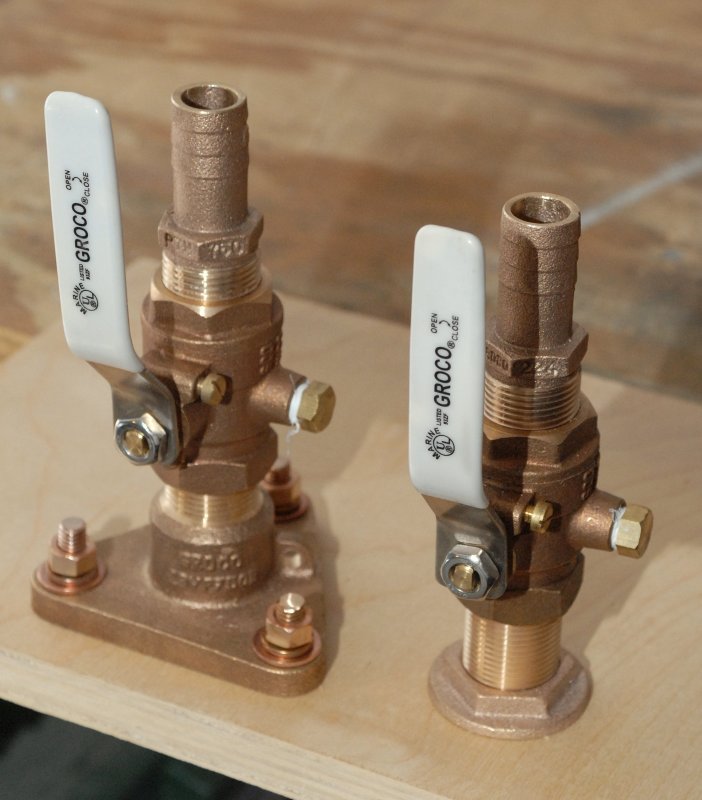
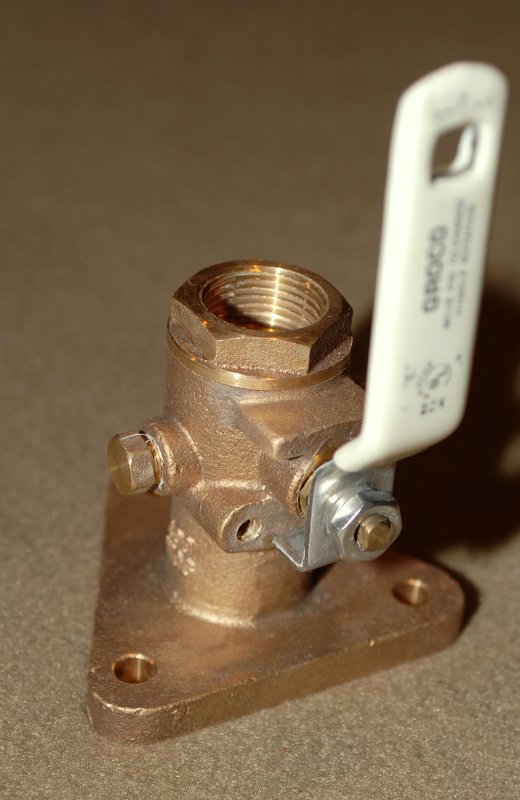
This Is a Proper Seacock
This item is called a seacock. A proper seacock has a flange that gets bolted to or through the hull. The seacock's purpose is to provide a positive shut off from water ingress. Flanged seacocks are considerably stronger than threading an in-line valve directly onto a thru-hull and are usually made of bronze, marelon or in some cases stainless steel.
There are many different brands of marine rated seacocks from companies like Groco, Spartan, RC Marine/Forespar, Apollo and more.
08-JUN-2007
This is NOT a seacock!
The title says it all! Simply threading a ball valve, or in-line valve as pictured above, onto a thru-hull (top photo on this page) is not a proper seacock. Sure, many sailors refer to any thru-hull mounted valve as a seacock but in the proper sense threading a ball valve onto a thru-hull or mushroom head is not a "proper" seacock.
This ball valve shows what can happen, in less than a year, using cheap "yellow brass" valves purchased from Home Depot. This valve was literally a week or two away from catastrophic failure of the boat sinking type!
As I've said, and will continue to say, USE ONLY marine rated valves of either bronze, stainless steel or Marelon and DO NOT buy valves for your boat at hardware stores or home centers like Home Depot!
08-JUN-2007
This is what happnes to Home Depot Ball Valves
As I said above NEVER use yellow brass or non-UL marine rated valves. The ball in this valve, that keeps water out of the boat, was completely gone, not there, totally missing, corroded away and never to be seen again in a little less than a years time!
Again, please DO NOT use home center or plumbing supply house brand valves & use only Marine UL rated valves & seacocks.
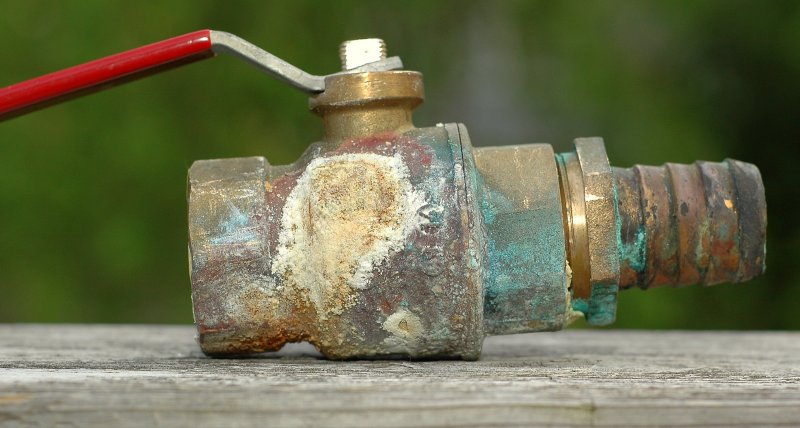
Failed Brass Hose Barb
Please DO NOT mix cheap yellow brass with proper 85-5-5-5 marine bronze below the water line. This is the result of a home center quality yellow brass hose barb when mixed with an 85-5-5-5 marine grade bronze elbow.
Yellow brass is nearly 40% zinc 60% copper and the zinc becomes the anodic metal. Dezincification, the eating away of the zinc in the fitting, can occur rapidly and is usually identified by a pinkish coppery colored brass that should have been yellowish gold. If not caught in time the item could potentially catastrophically fail and potentially put a boat on the bottom.
14-NOV-2010
Valve Literally Crumbled
OK one more image just in case you still think you can beat the odds and buy your fittings / valves at Home Depot.
This is a good example on two fronts:
#1 This should be evidence enough of why using a gate valve no longer satisfies marine safety standards. There was no way this valve was ever going to close fully even if the handle had not crumbled away. Seacocks should always be 1/4 turn ball or tapered cone type.
#2 This was a high zinc content valve most likely sold and intended for residential plumbing applications. When the owner tied to service it the valve literally fell apart in his hands. The pinkish/coppery color illustrates complete dezincification of the valve body which left it brittle. According to the owner who sent me this photo the bronze thru-hull fitting was in perfect serviceable condition but the brass valve just crumbled like tortilla chip.
This image is WORTH clicking on to get the full size picture! Look at it, let it absorb, then think about what would happen to your boat if this had happened to you while in the middle of the Atlantic... Bone chilling is what I see.
PLEASE DO NOT USE BRASS BELOW THE WATERLINE. MAKE SURE YOUR COMPONENTS ARE MARINE UL & MARINE BRONZE OR MARELON.
29-JUN-2015
What About Plastics?
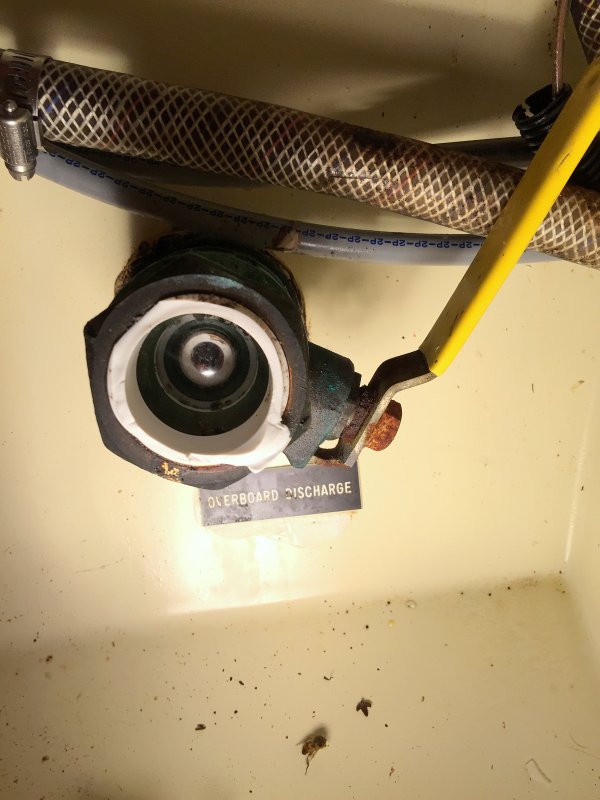
Customer: "Rod, I need your help quickly."
Me: "What's the problem?
Customer: "My wife was opening the overboard discharge seacock and the piping snapped off."
There are some materials we simply do not use below water and one of those is PVC. This seacock was positioned and installed in such a manner that to open the valve you essentiually used your upper arm as a bracing point on the hose. While this customer was 18 miles off shore they went to open this valve and SNAP. Lucky for the owner his wife was able to close the 1.5" seacock before it was too much of a problem.
I now had the lovely chore of extracting the snapped off piece of PVC, without damaging the seacock threads, and re-plumbing it with the correct bronze alloy.
Marelon is really one of the only plastics suitable for below waterline application. Please DO NOT use PVC. BTW this was a factory installation from back when this builder chose to ignore the ABYC standards. Think your builder is doing it correctly? Think again....
28-JAN-2009
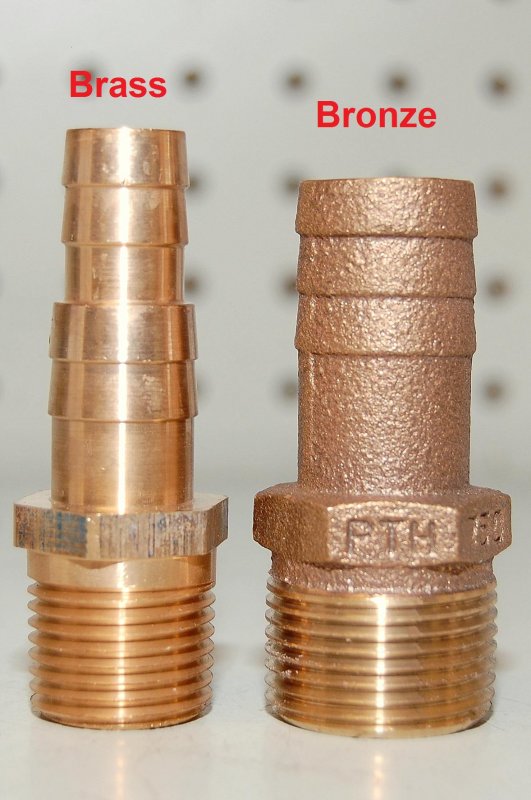
Brass & Bronze - How Do I Tell The Difference ?
So how do I tell brass from bronze? Usually brass fittings and hose barbs are more yellow in color and more often a "machined" finish rather than a "sand cast" finish. Marine bronze does not really like to be machined so it is most often left in "sand cast" finish. Bronze is also usually more of a deep goldish color rather than on the yellow side.
When in doubt ask your chandlery. Most every fitting can be found in bronze but you need to be diligent in sourcing it. I often hear folks say that pipe nipples are not available in bronze, only red brass. While red brass is far better than yellow brass in the world of corrosion resistance, true bronze nipples are available from Groco. They are the only manufacturer I know of making them.
Here's a very good hint on how to tell if it is bronze or brass; If you bought it at Home Depot or Lowes it is NOT marine bronze...
11-JAN-2008
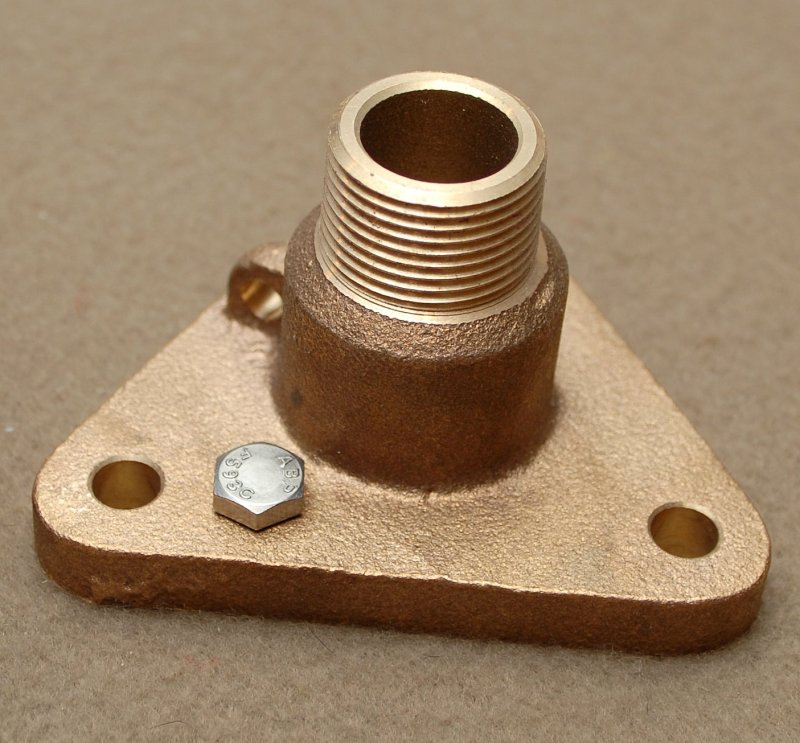
This is a Flanged Adapter Plate
This is a relatively new item in seacock technology. It allows the use of an NPT threaded ball valve on the top and a NPS threaded thru-hull then threads into the bottom.
As far as I know these are currently only made by Groco. The benefit is that even if the valve wears out you simply thread a new one onto the flange. This avoids a very time consuming job of removing the thru-hull, thru-bolts and seacock and then having to re-install these parts and fair over the bolt holes.
11-JAN-2008
Thru-hull Threads
This photo shows where the thru-hull actually threads into. Thru-hulls are NPS thread and so is the female side of a seacock or a flanged adapter plate so the threads match perfectly.
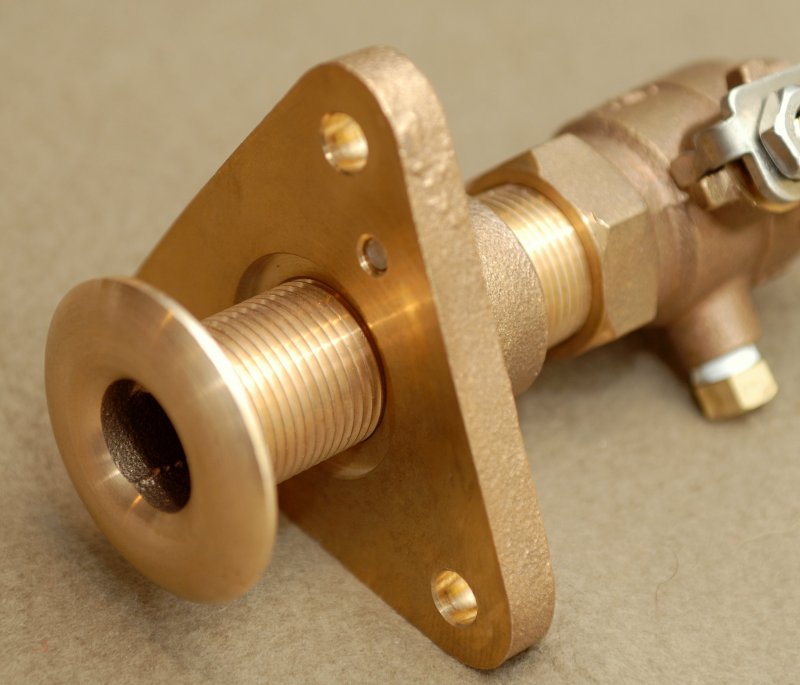
Thru-Hull, Flanged Adapter Plate & Bron
This picture shows the complete assembly minus the boats hull. Note that the handle clearly states Marine Rated. Use only Marine UL rated valves and seacocks for below water line applications.
Many insurance companies demand this for coverage and insist on marine rated valves so don't cut corners here.
*********PLEASE CLICK BELOW FOR PAGE 2*********
01-MAY-2009
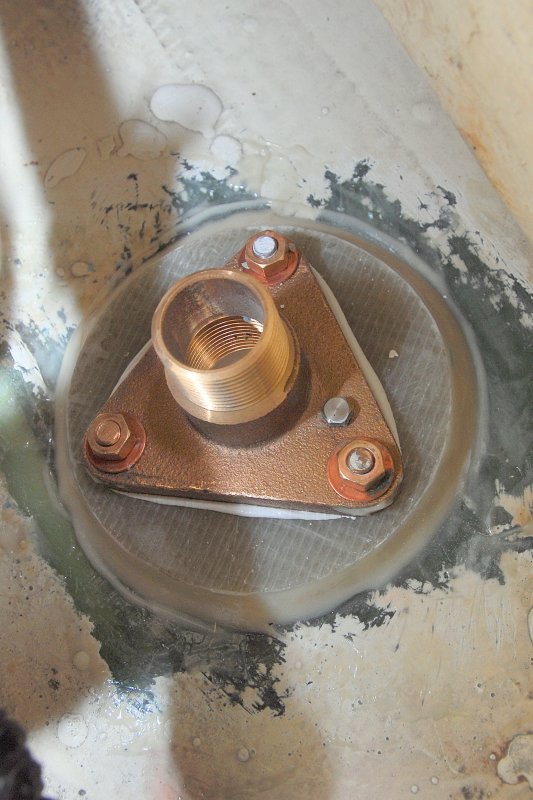
Flanged Adapter Plate Installed
Here is a picture of a flanged adapter completely installed in a vessel. The fiberglass backer was epoxied to the hull and through bolted and the flange bedded in Sikaflex 291.. There is no risk of breaking a seal with a through bolted flange when threading on and off a replacement or new sea valve because the three bolts hold it in place and prevent twisting and potentially breaking the seal when you apply a pipe wrench.
11-JAN-2008
Thru-Hull Threaded Into a Flanged Adapter Plate
Here the thru-hull has been threaded into the Groco flanged adapter plate. Straight threads to straight threads, a perfect match.
11-JAN-2008
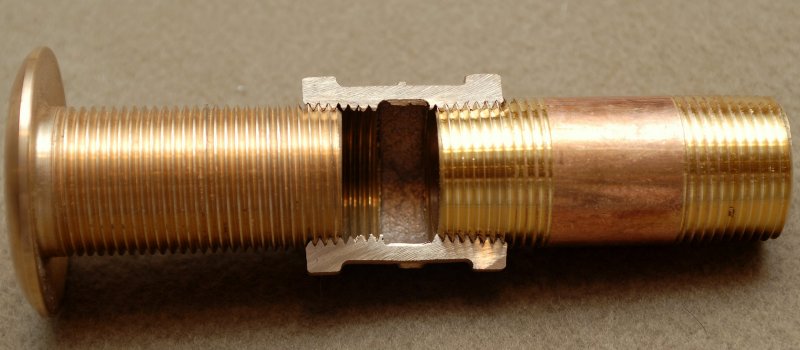
Mismatched Threads !!!!
I've had a lot of emails and questions regarding the "mismatching" of different thread types such as NPS (NPSM) and NPT.
Someone challenged the idea that mismatching threads was OK because "so many do it" so last night I made a cut away view to show why using two different thread types is really not such a good idea even if "so many do it".
While many boat owners & builders have screwed NPT threaded valves directly onto NPS threaded through-hull fittings it's clearly not a logical or the best idea. NPSM or NPS, as it's referred to, is the actual sub class of straight threads used in the marine industry. The M means "mechanical" seal they are not intended to seal or take pressure like NPT.
Manufacturers such as Groco warn against doing. Mismatching threads is done by lots of people but as you can see you don't get a lot of purchase compared to using matching threads. All threading machines have slightly different tolerances and some straight thread might screw in more and some may screw in less. The parts in the photos were purchased right off the shelf at my local chandlery.
To make this photo possible I basically used a bronze nipple, or threaded pipe, with standard plumbing threads of NPT (National Pipe Tapered) and a bronze coupling also the industry standard of NPT thread.
I cut the bronze coupling almost in half, for a cut away view, so I could thread the NPT bronze nipple into one side and an NPS through-hull fiting into the other. I then sprayed each with a McLube, to reduce friction but save the picture quality, and threaded both the NPT nipple and the NPS through hull into the cut-a-way bronze coupling by hand and until I had an equal resistance.
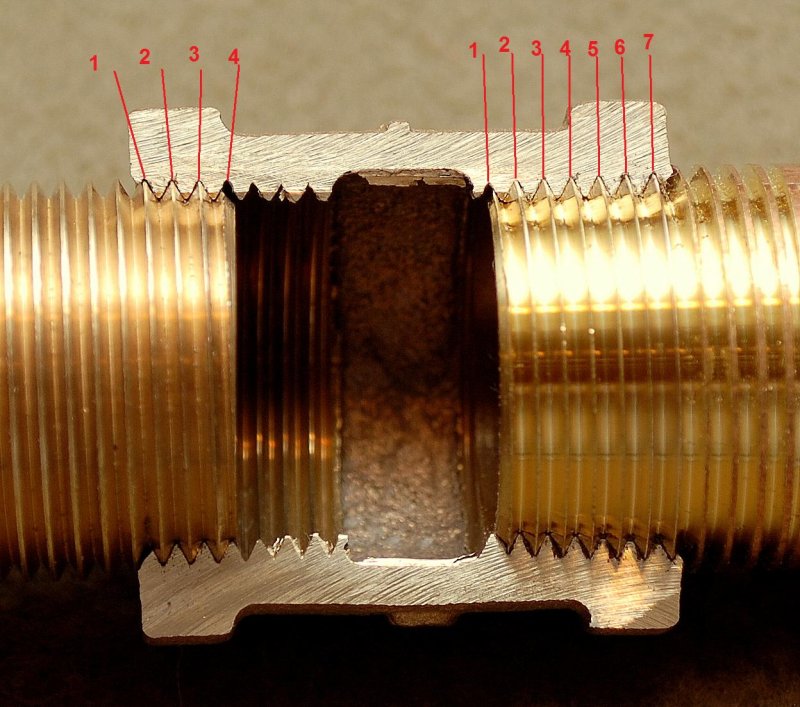
The results even surprised me. As you can clearly see the NPT nipple threaded into the NPT coupling a quite a bit further than did the NPS through-hull. One would expect this because NPT and NPT threads match. If you were to take a wrench to both you might get one more turn at best out of the NPS through hull but you may still get two or three full turns out of the NPT nipple.
If you look very closely at the picture you can also see the outer-most threads of the through hull are already NOT fitting tightly against the female threads of the coupling and the inner-most threads are quite tight or virtually bottomed out...!!! The square peg evidently does NOT fit a round hole.
This coupling represents the threads of an in-line valve. Most all available ball valves or gate valves have NPT or tapered threads and most all commercially available through hulls have NPS or straight threads which is a clear & potentially dangerous mismatch.
Sticking a ball valve directly onto a through hull gives you about three or four threads between sinking and floating so I can't, with a good conscience, recommend you do it. For safety's sake I suggest using proper seacocks with flanges.
I would have cut away an actual ball valve but I don't have a machine shop. The coupling represents and has the same exact NPT female threads as an in-line valve of either the gate or ball type...
11-JAN-2008
Mis-Match Count
In this close up you can really see why mismatching thread patterns is strongly advised against. There is a reason the ABYC (American Boat & Yacht Council) says the following:
From ABYC H-27:
27.6.1.3 Threads used in seacock installations shall be compatible (eg. NPT to NPT, NPS to NPS).
28-JAN-2009
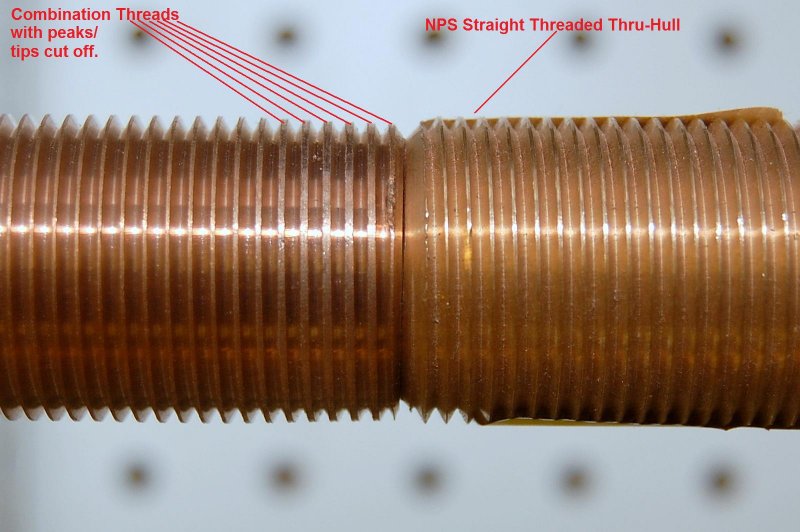
So What is a Combination Thread Thru-Hull
There is such a thing as a "combination thread" thru-hull. A combination thread is a half arsed way of making a ball valve thread onto a standard straight threaded thru-hull. Essentially the tips or peaks of the threads are machined off so the ball valve can thread over them and get more thread purchase.
While this is clearly better than using a regular straight threaded thru-hull with a ball valve it is still a "shortcut". One major draw back is that you can not shorten the thru-hull to minimize interior height. The longer the stem inside the hull the more leverage there will be to potentially snap it off. If you MUST use a thru-hull with a ball valve threaded on please source some combination threaded thru-hull fittings.
If you click on the picture to make it larger you'll clearly see how the first few threads are shaved down. This does NOT make it an NPT thread just a band aid approach to get some more thread contact area. This design was likely driven by large production boat builders in an attempt to save a few pennies. While certainly better than mixing NPS to NPT I would think twice before using a combination threaded thru-hull with a ball valve.
12-JAN-2008
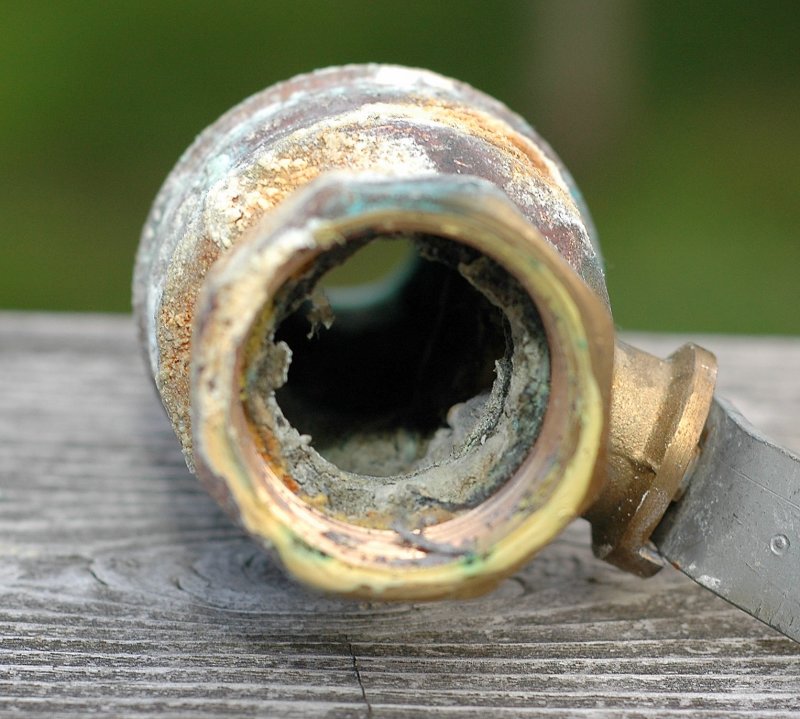
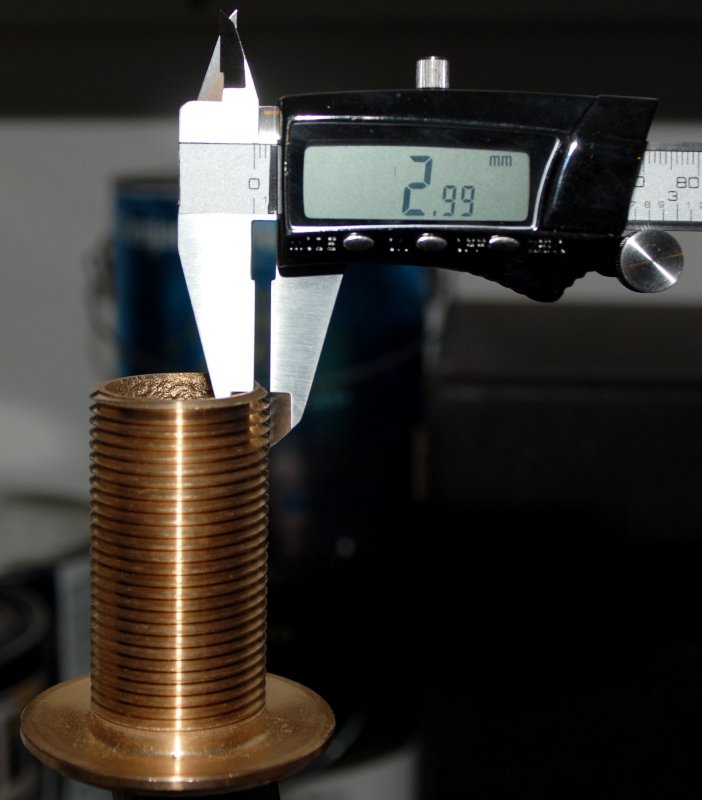
Measuring the Overall Wall Thickness of a 1" Bronze Thru-Hull
For this test I wanted to know the actual wall thickness of a 1" thru-hull fitting. The fitting is a standard bronze Apollo 1" thru-hull which I purchased right off the shelf at Hamilton Marine.
In this photo I am measuring the overall thickness of the thru-hull. It measured in at 2.99 millimeters thick.
I am illustrating this to show why simply sticking a valve onto a thru-hull (without flange) is not as strong or as safe as using proper flanged seacocks and threading the thru-hull into a flange or thru-hull. Simply threading a valve directly to a thru-hull, with no flange, increases the risk that the thru-hull could be snapped off.
I personally had this happen to me when a spare alternator hit my ball valve that was screwed directly to a thru-hull and cracked it. This is the number one reason I will now only use properly flanged seacocks and thread the thru-hull into it.
12-JAN-2008
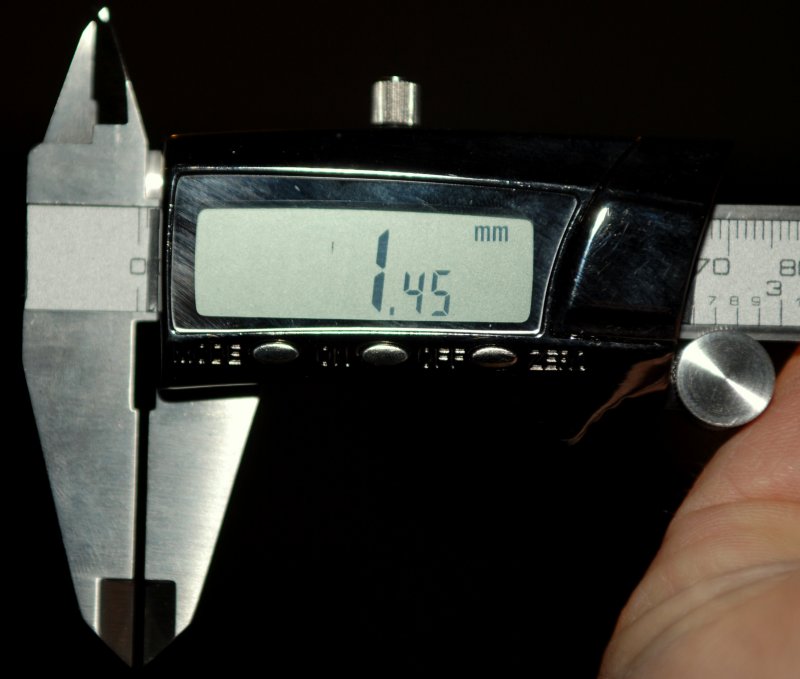
Thread Depth
To accurately measure the nominal wall thickness of this 1" thru-hull I first needed to measure the thread depth that had been cut into it. I used the depth gauge of my calipers to figure out the depth of the thread cut. In this photo you'll notice a little tab of metal sticking out the right side of the caliper. That tab of metal was the actual thread depth from the pointed outer surface of the threads to the bottom of the thread valleys.
12-JAN-2008
Thread Depth of 1" Thru-Hull
This photo shows exactly how deep the threads are cut into the the 1" thru-hull pictured above. The threads are 1.45mm deep on this thru-hull fitting.
If you subtract the 1.45mm thread cut from the 2.99mm overall thickness you get the remaining nominal wall thickness of 1.54 millimeters.
Yes, you read it correctly, the nominal wall thickness on this very popular Apollo 1" bronze thru-hull fitting is roughly the thickness of an average penny at only 1.54 millimeters.
12-JAN-2008
A Penny !!
As they say the proof is in the penny or is it pudding? As you can see the US penny is actually quite representative of the wall thickness of the Apollo thru-hull fitting pictured above. Again this was a brand new, off the shelf, 1" bronze thru-hull fitting purchased from Hamilton Marine.
In the photos below I measure the wall thickness of a seacock flange for the sake of comparison.
12-JAN-2008
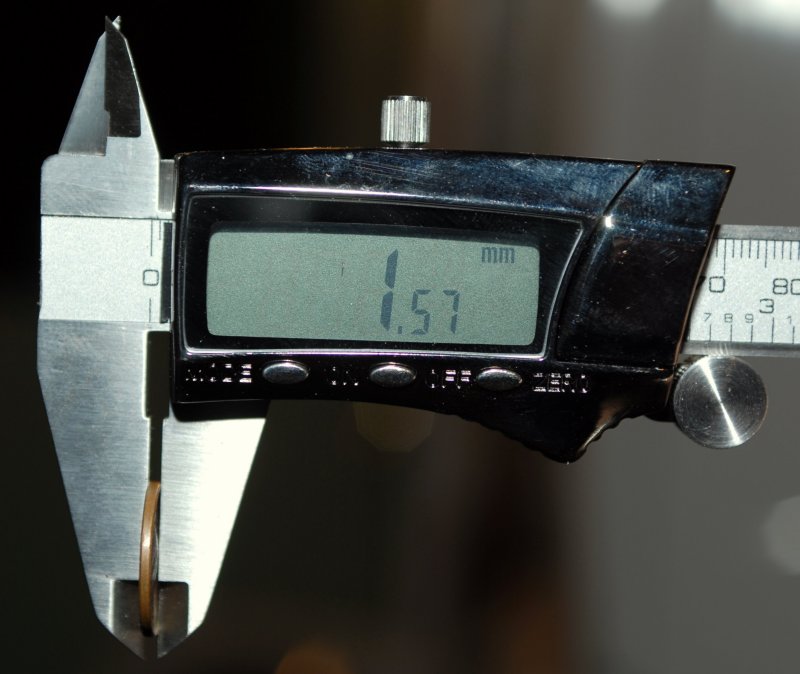
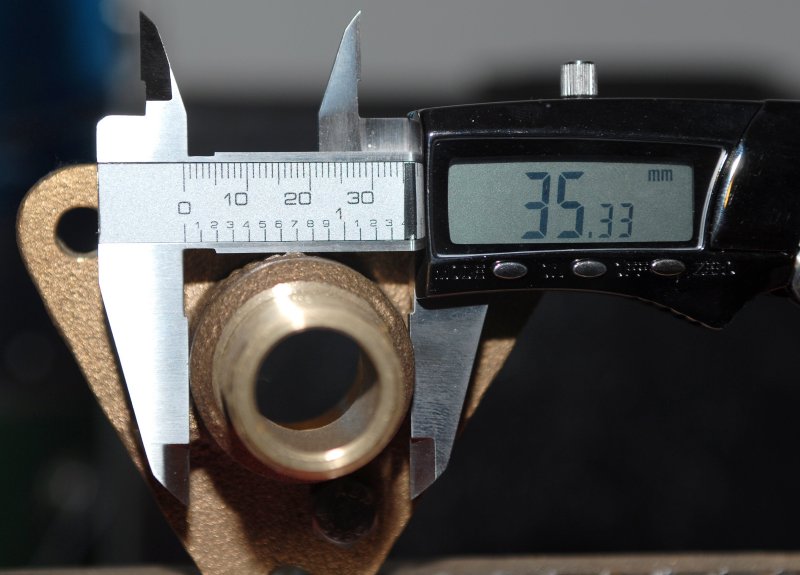
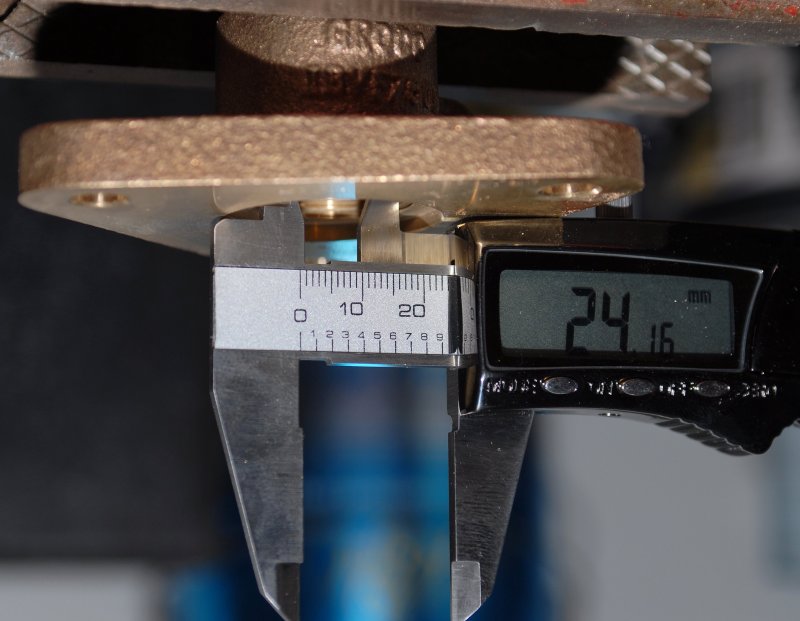
Measuring Outside Diameter of A Flanged Seacock
In this photo I'm measuring the overall thickness of a Groco 3/4 inch flanged seacock adapter plate. The overall outside thickness is 35.33 millimeters.
12-JAN-2008
Measuring Inside Diameter of A Flanged Seacock
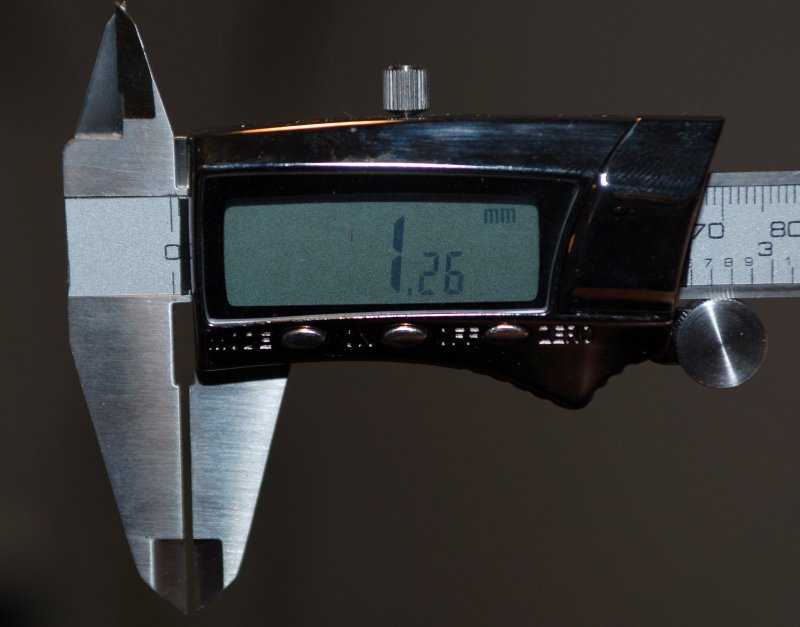
I'm now measuring the inside width to determine the nominal cross section thickness as compared to just the thru-hull from above. The inside width measured 24.16 millimeters. If you subtract 24.16mm from 35.33 you get 11.17 millimeters. That 11.7 millimeters then needs to be divided by 2 because I had to measure the OD/ID. To figure nominal wall thickness I used the thread depth of 1.26mm. Measuring these threads, inside the flange, would have been very hard and most likely not precise and they should theoretically be the same as the threads on the top of this fitting which I could measure.
So in summary outside width was 35.33 now subtract 24.16 and you have 11.17. Now divide that by 2 and you have 5.58mm now subtract the thread depth of 1.26mm (as measured from the NPT threads on top of this 3/4 fitting) and you get a nominal wall thickness of 4.32mm millimeters.
With a nominal wall thickness of 4.32 millimeters this flanged adapter plate, at its base, is more than 2.8 times the thickness of the 1" Apollo thru-hull fitting I measured above.
13-JAN-2008
3/4 Inch Flange Thread Depth
*********PLEASE CLICK BELOW FOR PAGE 3*********
13-JAN-2008
3/4 Inch Flange Overall thickness at Top Threads
In the interest of fairness I also wanted to measure the total wall thickness of the flange, at the top threads, to compare it to the 1" thru-hull nominal wall thickness. I understand I'm not comparing two 1" or two 3/4 inch fittings but the points remain the same and the wall thickness is what I am trying to get at.
This fitting measured an overall thickness of 4.04 millimeters and a thread depth of 1.26mm millimeters. When you subtract 1.26mm from 4.04mm you are left with a total nominal wall thickness of 2.78mm. This makes the thickness, of this 3/4 inch fitting, at the threads, approximately double that of the 1" Apollo thru-hull fitting.
MAY-2006
Help Support This Site
Like what you saw or read in this article? Was it helpful? Could the information save you some money? Would you like to see more articles like this?
If so feel free to donate, support the site, and keep it growing. Please DO NOT feel obligated at all. If you like it and want to make a donation, please do. Your donations help keep the content coming and also help keep it FREE.
Click the DONATE button below if you would like to make a donation via PayPal.