With battery technology getting more and more costly and the prices of even "inexpensive" Wal*Mart batteries climbing over $100.00 each, keeping your banks healthy can be a good return on your investment.
Installing a panel in the 30 to 85+ watt range can be cost effective and it can lead to longer battery bank life.
With dockside corrosion issues running rampant in many marinas solar dock side charging is gaining in popularity. This allows owners to "unplug" their boats in thus avoid many potential corrosion issues.
Some marinas charge as much as $18.00 per foot per season for just 30A shore power. That expense for a 40 footer will run you $720.00. Granted, if down South, you'd lose the ability for AC but the savings in electricity charges alone can pay for a very nice array. For boaters who don't need dock side refrigeration or air conditioning this can mean future cost reductions beyond year one. With a large enough array many boat owners are able to fully power DC refrigeration needs while off cruising or while dock side.
Quality panels these days are running under $2.00 per watt making them a significantly better value than they have been at any time in the previous 25 years..
12-OCT-2011
An 80 Watt Panel Mounted To Davits
If your vessel has davits they can make a very good spot to mount a panel. This 80 watt monocrystalline panel cost under $80.00 in materials to build the mounting system. The davits were already there, so why not put them to better use. This panel is mounted on 1" 316 stainless steel heavy walled tubing. As an added benefit it can also be articulated towards the sun if needed.
23-SEP-2011
A Small 30W Panel
I work on lots of boats that are sailed off of moorings and as such they tend to have very short battery life no matter what brand or how expensive. Some types tolerate this abuse, the lack of ever getting to 100% state of charge, better than others, but none like it. Batteries like to be topped up to 100% as often as possible. When batteries are not topped up sulfation forms on the battery plates and they begin to suffer and die.
When you are off cruising, or sailing from a mooring, your battery bank will rarely if ever get back to 100% state of charge. Most cruisers cycle their banks between 50% SOC and 80-85% SOC. This is due to what is called "battery acceptance". The long and short is that in order to top your bank off to 100% state of charge it would take many, many hours of running the engine. For an average sized battery bank this time to 100% SOC is in the range of 10+ hours. Unless you're running the "ditch" ten+ hour motor runs are pretty rare in sailboats.
As lead acid batteries charge they accept less and less charging current. Rapidly declining acceptance begins around *80% state of charge (* depends upon size of current source). Putting the last 20% into the bank, due to changes in resistance as the batteries approach full, is like walking up hill on ice. It will take a long time to get to the top or full, even in the case of batteries charged via the engine alternator. With an alternator trying to charge much beyond 85% state of charge simply becomes a waste of fuel.
If trying to charge your banks through idling at anchor it can become an even more expensive proposition. Diesels do not like to be run lightly loaded and idling the engine for long periods, to charge batteries, can lead to cylinder "bore glazing". With diesel engines running well over 10k for replacement, and over 5K just for a re-build, supplementing with solar becomes even more attractive to the boater budget. No one likes to budget for a re-build.
For a few hundred dollars you can greatly extend the life of your bank and start each weekend adventure with a battery bank at, or darn near, full.
23-SEP-2011
Sizing A Panel
How do you size this? At a minimum a panel with a max output amperage of 1.0A to 3.5A can work, depending upon the size of your bank, and depending upon which charge controller you use. You can easily go beyond 20A with solar but you need some real estate to devote to it.
Ideally you want the alternator, or generator, to handle "bulk" charging and bring the bank back to 80-85% state of charge. from there you can let the solar panel do the rest and bring the bank back to 100% SOC, even when you're not there during the weekdays.
If you want to satisfy cruising needs such as refrigeration, instruments, AP etc. then your array will get quite large.
The faster you can bring the bank from 80% to 100% the less sulfation you will have and the longer battery life you'll get.
For a sizing example, lets look at a bank of 300 Ah's for a "mooring recharge".
With simple math you can see that the last 20% of capacity is 60 Ah's. However you need to take charge inefficiencies into account too so you'll really need to put back in about 70Ah's +/- to get back to 100% state of charge.
For sailboats the panels are usually left flat when your not there so that you can capture "most" of the sun. In a land based solar array the panels are fixed. In a land based array the property is not moving like a boat does, and the panels can be angled at the sun for the best overall performance.
For this reason alone land based solar calculations won't apply well to boats. On boats the panels are rarely oriented or angled at the sun for optimum solar gains.
Having the ability to "aim" the panels at the sun, on a boat, is not usually a workable solution when swinging on a mooring, or at anchor. Panel position on sailboats is a certainly a compromise but one designed to do the best we can. Obviously if you are at a dock, you can rig the panels and aim them more appropriately, but not on a mooring or off cruising where your boat will swing at will. Being able to "aim" the panels can increase the performance quite a bit so if you're at the same dock every week you may want to consider an articulating panel mounting system.
Because of these aiming restrictions you can figure on about 3.0 - 4.5 hours of full rated current output per day, on average, for the Northern climates,. Down South 4.0 - 5+ hours per day the closer to the equator you get. These are full current ratings at 25C panel temp. Of course weather can play a huge role and you could see slightly more or slightly less. Generally speaking it is best to size for worst case scenarios, as I have yet to hear anyone complain they had too much solar..
Some folks use 5 hours per day in the Northeast but after lots of monitoring of my own panels, and customers, I found that to be a little to generous. Some days it will be more some less but here in Maine 3.50 - 4.5 hours at full output, as an average sizing number, seems to work best.
So, a 300 Ah bank @ 20% down = 60 Ah's that need to be returned + charge inefficiency of about 15% = 70 Ah's total needed for a "full" bank. The math looks like this; Ah deficiency X 1.15 = needed recharge Ah's.
A 2.5A output panel X 4.5 hours per day = 12.5 Ah's/Day returned to the bank. If you have phantom/parasitic loads, like a propane sniffer or other "always on loads, subtract those and this is your "net" average/day.
Next divide 70 amp hours by 12.5 and you can see that it will take approximately 5.6 days to go from 80% SOC to full on a 300 Ah bank.
I feel that's a little long so would prefer to see a panel in the 3.5A minimum range. Bigger is always better but this becomes a "real estate" and, let's admit it, an aesthetic compromise with many boats and boat owners.. A 3.5A panel shaves a full day off the time it takes to hit full when compared to a 2.5A panel.
For cruising figure the maximum amount of time you want to run the engine or gen set per day, or every other day, then base your array size on the difference needing to be made up. For example, if you only want to run your engine for an hour per day, when you hit 50% SOC, and your alternator can get you from 50% to 70% in an hour then you have a 30% deficit to make up plus charge inefficiencies. You can size your panel to make up this deficiency....
11-AUG-2012
Do I Need A Controller ?
I get asked this question quite often and the answer is almost always a resounding yes.
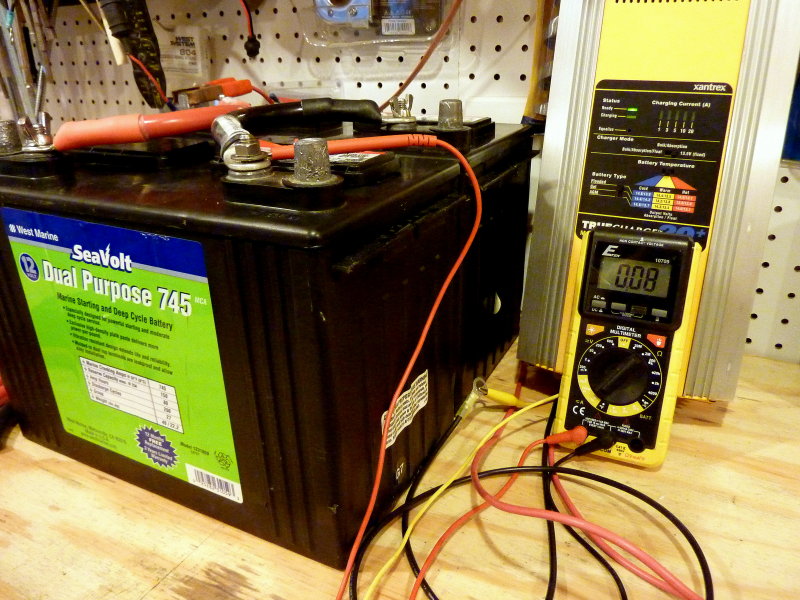
In this photo I have two group 27 batteries, in parallel, consisting of 160 Ah's at the 20 hour rate. The batteries were fully charged then went into float mode.
As we can see on the digital volt meter the current accepted / needed to maintain a float condition, on these two parallel group 27 batteries, is just 0.08A or eight one hundredths of an amp. EIGHT HUNDREDTHS OF AN AMP!
A rather diminutive 10W panel can produce about 0.51A. Even with a small panel if the bank is left on charge for multiple days at a time, with no loads as is the case with many boats, you can over charge your batteries. While that difference may not sound like much the difference between the 0.08A the batteries want to accept at float voltage and what a 10W panel can produce, about 0.51A, is a 537% increase in current.
23-SEP-2011
Wiring & Controllers
Wiring:
The wiring of your panel to the boats battery bank is critically important. Most decent 12V nominal panels will output a voltage of around 16.0 to 19.0 volts +/-. Giving up any of this voltage to voltage drop can affect how quickly your bank is recharged. If you're using an MPPT controller voltage drop should ideally be almost nothing in order to maximize the performance of the MPPT controller. I like to size panel wiring for a 1-2% voltage drop max. With 12V nominal panels the wire from panel to controller will need to be bigger than with 24V or 48V arrays.
Controller:
Any panel sized to actually "recharge" your bank will need a solar controller. There are vast quality ranges amongst controllers and a bad controller can be a waste of money and diminish the efficiency of your system.
There are essentially three types of controllers;
MPPT = Multi-Point Power Tracking - In a nut shell MPPT controllers take excess voltage and turn it into current rather than wasting it. Your batteries only need around 14.4V to charge but you have panels capable of 18V+.. Without an MPPT controller this excess voltage is just wasted and lost. An MPPT controller converts excess voltage, above battery voltage, into usable charging current. The claims are 10 - 30% more output. I must admit I have never seen a 30% boost but I have seen 6-18% increases over the max rated panel amperage output. I have even done A/B side by side comparison with PWM and MPPT and seen this in real time.
Most MPPT controllers will work best when your array gets over 150-180 watts in size or with high voltage panels. One benefit if using higher voltage panels, say 24V nominal panels, then feeding them into an MPPT controller, is that they can begin to produce usable current earlier in the...
DO YOURSELF A FAVOR AND AVOID CONTROLLERS THAT ARE NOT MENTIONED ABOVE! CHINESE CRAP HAS INFILTRATED eBAY, AMAZON & NUMEROUS OTHER SOURCES. CAVEAT EMPTOR IF STRAYING FROM THIS LIST OF CONTROLLER MANUFACTURERS!!!!!!!!!!!!!!!!!!!!!
PWM = Pulse Width Modulated - These are the best alternative to an MPPT and they charge quite efficiently but can not turn excess voltage into current.
Shunting Controllers - These controllers shunt or switch the panel current/voltage OFF when a preset voltage is reached and then turn back on when the battery bank voltage drops/decays/falls to a second preset ON voltage. These are the least desirable controllers. If a controller does not specifically say PWM or MPPT is is probably a cheap shunting controller. I can not suggest spending your hard earned money on shunting controllers for a marine solar application. (SEE VIDEOS BELOW FOR ACTUAL BEHAVIOR)
02-AUG-2011
Panel Mount Controller
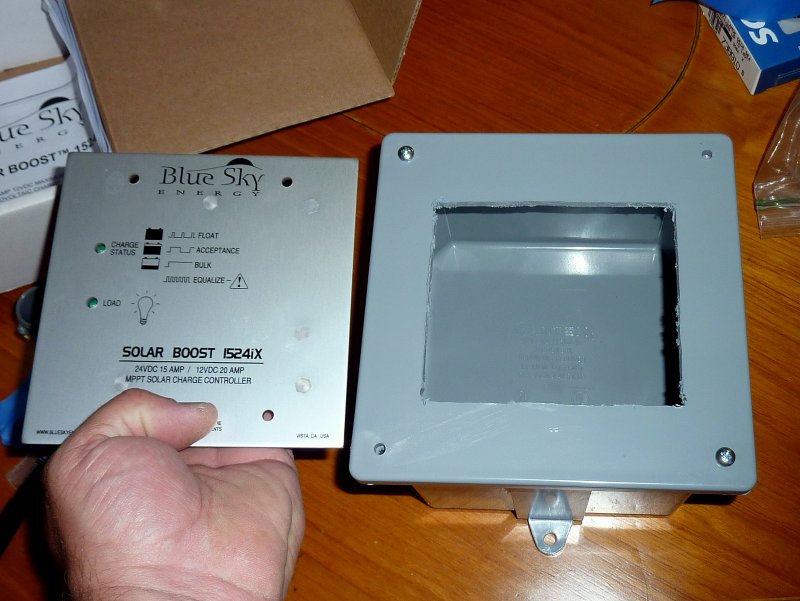
A number of controllers, such as some models by Blue Sky, require they be fit into a panel or mounted into a box. They are fairly large and many boats simply don't have enough room near the panel to mount them.
In a situation like this an inexpensive weather resistant electrical box, about $10.00, can work well. I simply use a multi-tool, Fein, Milwaukee, Dremel etc. to cut the face to fit the controller.
When the banks are full these Blue Sky controllers can give off some serious heat. Be sure to mount them so they can dissipate it well. The aluminum front panel on this controller is the heat sink.
02-AUG-2011
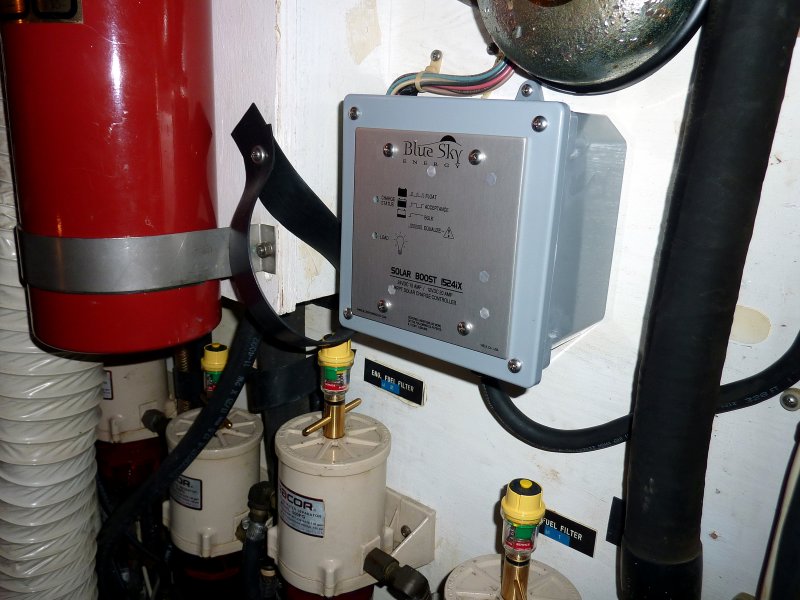
Using A Weather Proof Box
On this boat the controller was mounted in the very large engine room to remain close to the batteries. The weather proof box made for an easy mount.
23-SEP-2011
Panel Types
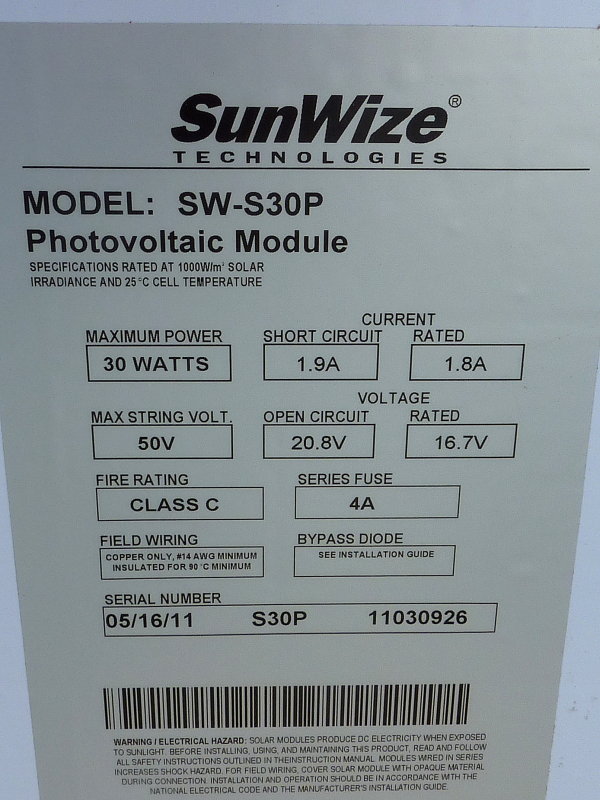
Today there are not a lot of quality manufacturers building small panels suitable for marine use. Most are building panels in the 100+ watt range these days. For small panels I have been installing panels from SunWize and, while not the quality of a Kyocera, they have been of decent quality. Some manufacturers specifically exclude "marine use" in their warranty so its best to check with them before you buy a solar panel for a marine application.
Mono & Polycrystalline:
These are by far the most long lived and efficient solar panels per sq in. These are almost always rigid panels in an extruded aluminum frame with tempered glass not an EVA skin. These panels are more prone to shading issues but also have about double the output per sq in when compared to most inexpensive flexible panels. Glass covered arrays also do not suffer from a flexible EVA cover deteriorating from the sun's UV rays and can often offer better UV protection to the cells over a long duration.
While Dupont has really pushed the envelope on EVA films, and it has gotten better, a quick look at many of the warranties will show a difference between flexible and rigid panels. Kyocera for example warrants their panels for a minimum of 95% output for 20 years. Some EVA panels are warranted at 90% from year 1 and at only 80% output starting at year 10, the Kyocera's are warranted at 95% output at year 20, and they've actually been around longer than their warranties have been in place. Something to consider..
Amorphous Panels:
Amorphous panels are made differently and by their nature require nearly double the surface area to equal the same watts in a mono or polycrystalline panel. They are upwards of 50% less efficient than a good mono or polycrystalline panel.
In the marine market many of these panels are made to be flexible which can make them even less efficient. The combination of a flexible EVA lens, that can slowly degrade in UV, and the fact that one side may not be aimed at the sun if "flexed", say over a boom, can often mean very little output for the sq in you have out there. Even in perfect conditions you still need a lot more space for an amorphous panel than you would a mono or polycrystalline panel. Yes they can be convenient but you'll need to weigh the benefit/space/cost & efficiency issues too.
While there are some high efficiency flexible panels that are not amorphous, such as the Solbian's made in Italy, that compare in output to the rigid panels, they are quite costly compared to rigid panel at nearly triple the cost or more. Ganz also makes some efficient smaller panels but again the price is about double or more what a rigid panel costs. If that convenience is worth it, then they are a good deal. These semi flexible panels can also save on installation costs as the "support" frames needed are smaller and lighter and less costly to develop.
The neat thing about the Solbian "semi flexible" panels is they can be sewn right into a bimini top and have no sharp edges. Some of the solo round the world racers are using this technology and, good for us, it will eventually trickle down. Due to the flexible nature however they can possibly suffer from UV degradation faster than a comparable glass encapsulated panel.
Amorphous panels do have one benefit and that is they are less prone to shading issues than a mono or polycrystalline panel. This "benefit" however can be quickly dwarfed by the real estate needed to equal the output of a mono or polycrystalline panel.
14-OCT-2016
Understanding the Specifications & PWM vs. MPPT
Solar panels are most often rated in three general tests, STC which means "Standard Test Conditions" and NOCT which means "Normal Operating Cell Temperature". These two tests define its general operation parameters. There is also a test called PTC, which includes a cooling wind speed, and 113F temps, but it is rare to see a panel rated at PTC.
A solar panel will also undergo an Isc or "short-circuit current" test at 1000 watts per meter� of irradiance. The Isc test is just as it is described, the panel is physically short circuited under ideal testing conditions.
Seeing as solar cells are current-limited the short circuit test defines the maximum current it can deliver under ideal conditions of 1000 watts per meter�. While it's theoretically possible for the panel to exceed the Isc, this would be extremely rare and you would need a very cool day and better than 1000 watts per meter� irradiance levels to do this. This occurrence would be so rare that the NEC and NFPA use a panels the Isc rating for sizing over-current protection.
The solar panel will also have a specification for VOC or "Voltage - Open Circuit". This just defines the maximum voltage the panel will develop with zero load and 1000 watts per meter� of irradiance.
STC - Standard Test Conditions:
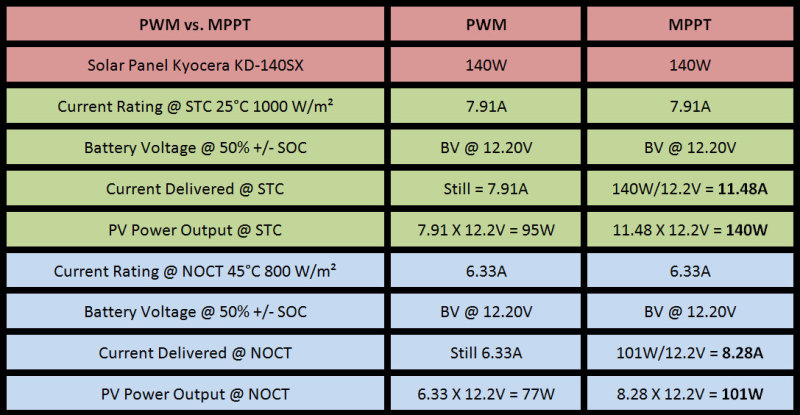
The STC test is conducted at 25�C or 77�F and the panel is given an irradiance of 1000 watts per square meter. These are conditions you will rarely see in the real world yet these are the ratings they sell the panel with. In other words a 140W panel at 77F with 1000 watter per square meter of irradiance can deliver 7.91A oc current. Will you regularly see this, heck no. Can you see this certainly.
NOCT - Normal Operating Cell Temperature Test:
In the NOCT testing, or as I tend to call it realistic testing, the panel is tested at a more reasonable temp of 45�C of 113�F. In this testing scenario the irradiance is also reduced to 800 watts per meter� of irradiance.
What the chart shows is two ways to look at the specifications. One with a PWM controller and a 50% discharged battery and one with an MPPT controller and a 50% discharged battery. Both STC and NOCT data have been used for the calculations. Because nominal 12V panels are usually 17V to 18V rated, and marine batteries charge at 12.0V to 14.8V you will not see the rated "wattage" from the panel unless you use an MPPT controller.
"But RC I once saw my panels exceed the STC current rating and I only have a PWM controller?
While not totally impossible it would be a very rare occurrence without an MPPT controller. If you combine a very cool day with better than STC/perfect irradiance & a very deeply discharged battery you may be able to approach or even very slightly exceed the Isc rating. As panels get cooler, and we have perfect irradiance, we can see a panel slightly exceed its STC rating even with a PWM controller. Exceeding Isc/short circuit well that is much tougher..
16-SEP-2011
More On Shunting Controllers
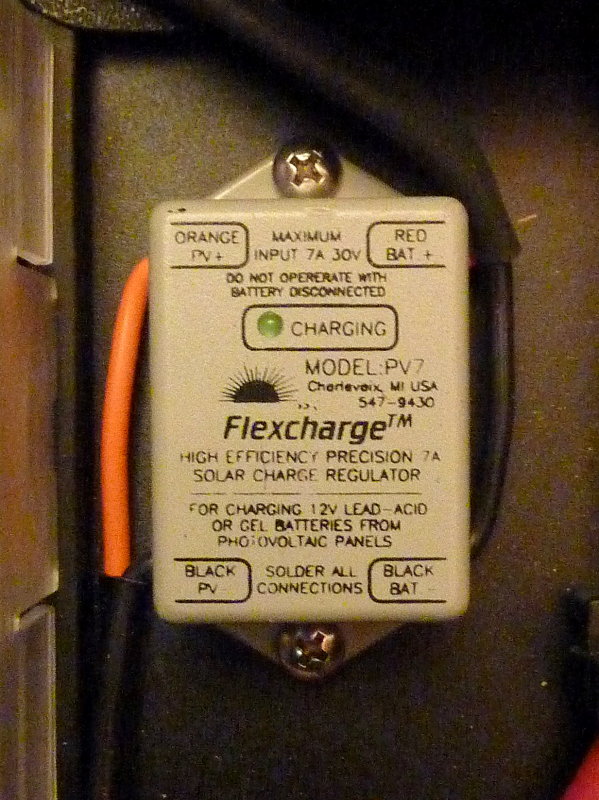
This is the Flex Charge PV-7 shunting controller. They are inexpensive and among the best of the shunting controllers. Flex Charge makes very reliable products. That being said, your total time to "full charge" may be compromised with this type of controller. If you buy a "shunter" the Flex Charge is the one to get. I would still suggest a PWM or MPPT controller.
Please be careful with shunting controllers. These devices begin switching ON/OFF once the bank hits absorption voltage and they can really cut your "time to 100% full" by days, not minutes.
In the case of some of the Sunforce controllers, often sold at West Marine, they switch OFF at around 14.2 volts and they do not switch back ON again until the battery bank voltage falls back to 13.0V.
This may be fine for off grid where you often have a load that sucks the bank back to 13.0V very quickly, but, with a boat on a mooring, with no loads, it can take a healthy bank a LONG time to drop the surface charge back to 13.0V.
I have some customers banks of AGM & deep cycle wet cells that will hang out at over 13.0V for over an hour. That is an hour of lost charging time waiting for a cheap shunting controller to switch back ON, from the OFF state, and provide maybe 60 seconds of charging before raising the bank to 14.2V and then shutting off again. Sometimes these cheap controllers will never restore the bank to full, in the time you need them to, no matter how big the array.
Below is a video of one of the "better quality" shunting controllers, a Flex Charge PV-7. It shuts OFF at about 14.4v and does not come back on until the bank voltage has dropped to about 13.6V. The first video is showing the "current" but you can watch it turn ON and OFF. I applied a load of 0.1A just so it would go to -0.1A when OFF for the video. When you get close to full, upper 90's as a % of charge, your OFF time can be as much as 10-20+ times longer than your ON time with some cheap controllers.
Shunting Controller ON/OFF Behavior - Current
Shunting Controller ON/OFF Behavior - Voltage
In this case the ON time is about 5-6 seconds and the OFF time close to a minute to get the bank back down to 13.6v before it can turn back on again. This bank still had 20 Ah's to go and it would take 5-7+ days for this bank to eventually get "full" from an 80-85% state of charge with 5-6 seconds on and 60 seconds off, remove the 0.1A load and it would likely make this even longer..
It should be noted that before I took these videos the banks were charged to full using a shore charger until they were accepting less than .5% of C (capacity) at 14.4 volts. At this point, I left them on float for two more days. The battery monitor was then re-calibrated manually to full or 100% State of Charge.. Next I applied loads and removed approx 30 Ah's from the bank. I then monitored the time it took to replace the 30Ah's removed from the battery bank.
Contrast that Flex Charge controller, or a Sunforce, with a quality PWM or MPPT like the Genasun's and the difference in the last 15% of charge, and the time it takes, can be quite dramatic.
I recently replaced both a Sunforce and a Flex Charge shunting controller with Genasun MPPT controllers. On one boat "FULL" was cut from averaging 7-8 days to about 2 days and on the other boat "FULL" was cut from roughly 5-6 days to about 1.5 days. Same boat, panels, wiring, batteries, just a much better quality controller that does not turn ON/OFF, slowly, like a shunter will. A lot of the controllers you buy from "discount" solar houses & eBay sellers are "shunters".
If you stick with Morningstar, starting at the Pro-Star series, Blue Sky, Outback, Genasun, Rogue Engineering and a couple other reputable controller manufacturers, you'll be doing well. I've found the eBay stuff can very often be a scam, so be careful.
I have replaced a number of eBay, "so called", MPPT controllers that were not MPPT at all. The were complete scams. The harsh reality is that behind the "MPPT" sticker and box was nothing more than a simple shunting ON/OFF controller. MPPT & PWM controllers do not shut off for long periods of time like shunters do. The average Joe does not know how they should work so these eBay scammers often get away with it.
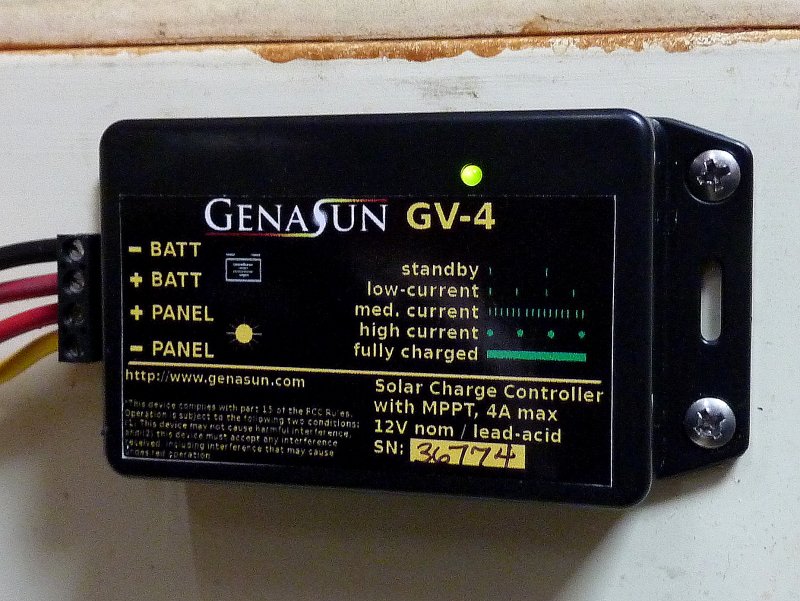
The Genasun MPPT's are a very good value for smaller for panels. Under 150W, that is pretty much all I install now. The key for me is the standby draw. All MPPT controllers use "some" current when connected to the batteries. The Genasun controllers are about the lowest I have measured for parasitic load.. A lowere parasitic load means during nighttime hours your controller is not eating into your sun up gains as much as some others.
When I have a larger array I will use Blue Sky, Rogue or Morningstar MPPT controllers, though I still use some Morningstar PWM controllers too.
Please be careful with "cheap" controllers as you often get what you pay for.
I generally buy from Northern Arizona Wind-Sun, Wholesale Solar, eMarine Systems (LINK) and a few others. I pay a little more but I know the quality is good and they hold up in the marine environment.
16-JUL-2013
Do I Need A Solar Charge Controller ??
I get asked this question quite often and the answer is almost always a resounding, yes. There are always caveats to everything however..
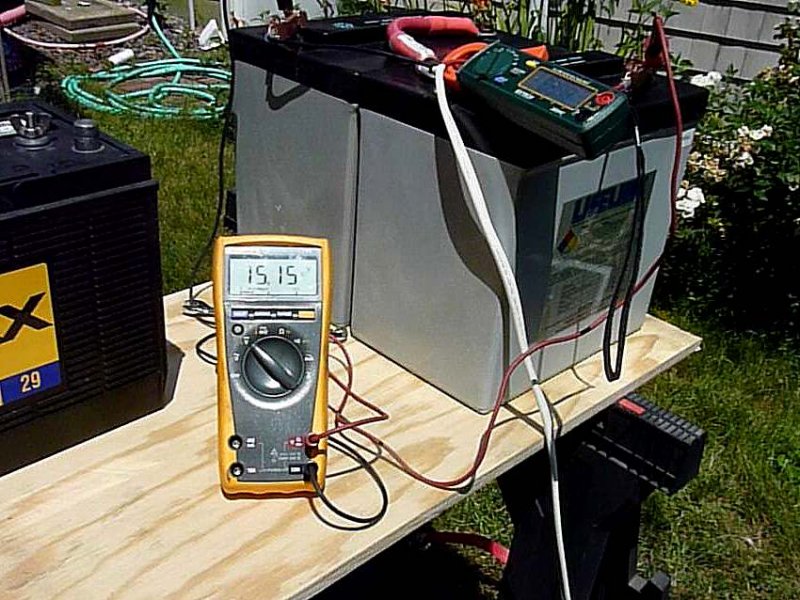
I finally had the opportunity to set this up for demonstration with a small 12W panel and two banks. Both banks were charged with regulated solar until full then the controller was removed. Panel was left flat, not angled towards the sun, just like it would be on a boat. This did not happen over night but the small 12W panel eventually brought both banks over 15V!!! This panel is 10% of the 125Ah bank in watts and only 5.5% of the 220Ah bank in wattage..
Bank #1 = 220Ah Lifeline 6V AGM
Bank #2 = 125 Ah Marine Maxx Group 31 Flooded Lead Acid
Solar Panel = 12W
As you can see even a diminutive 12W solar panel can push a 220Ah bank of Lifeline batteries well over 15 volts!!!! Do you need a solar controller? The answer is almost always a resounding YES!
For a more in-depth look at this topic please see this article:
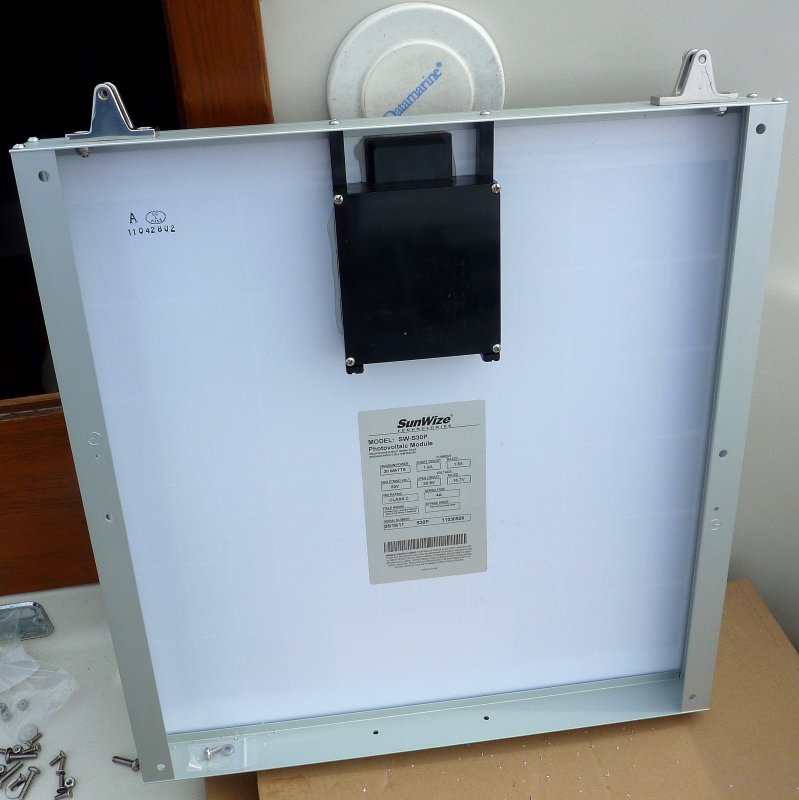
One of my biggest peeves about the solar industry is the move to MC4 junction boxes. These boxes have the wires sealed and no access inside the j-box under the panel. In the marine environment I personally prefer a j-box with a terminal strip. It allows for easier paralleling of the panels and if installed correctly they last for a long time. I always try to find panels that do not ship with MC4 connections.
This Sun Wize panels ships with a standard j-box. Most DIY's do not own the proper crimp tool for crimping MC-4 solar connectors. If you buy a panel with MC-4's you'll either need to pay to have them terminated or pay to buy the proper crimping tool.
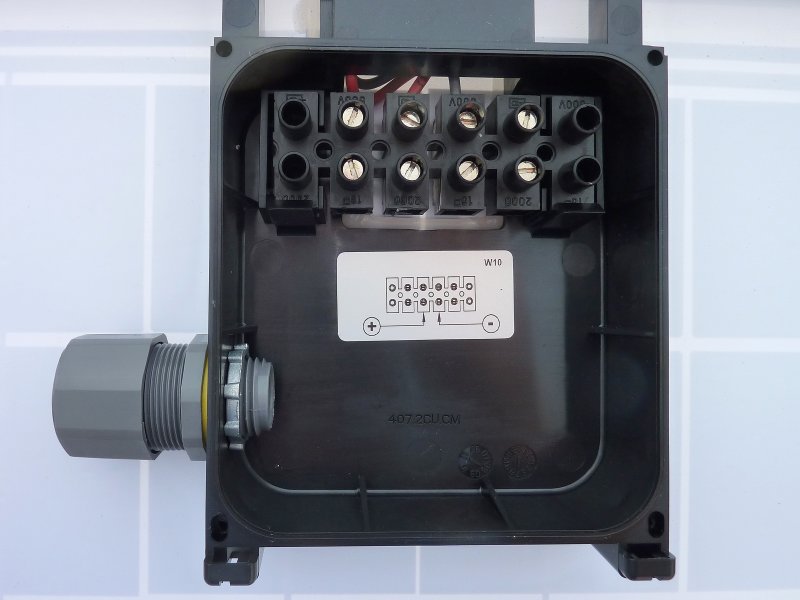
Inside the j-box you simply connect your panel output where shown. Keep in mind this is a small 30W panel. Bigger panels use considerably more robust terminal strips. This is a small "Euro" strip because the panel is small.
Please be aware that the knock outs on this brand of panel are tough as nails. Please be VERY careful knocking them out or you could break the j-box and destroy the panel..
23-SEP-2011
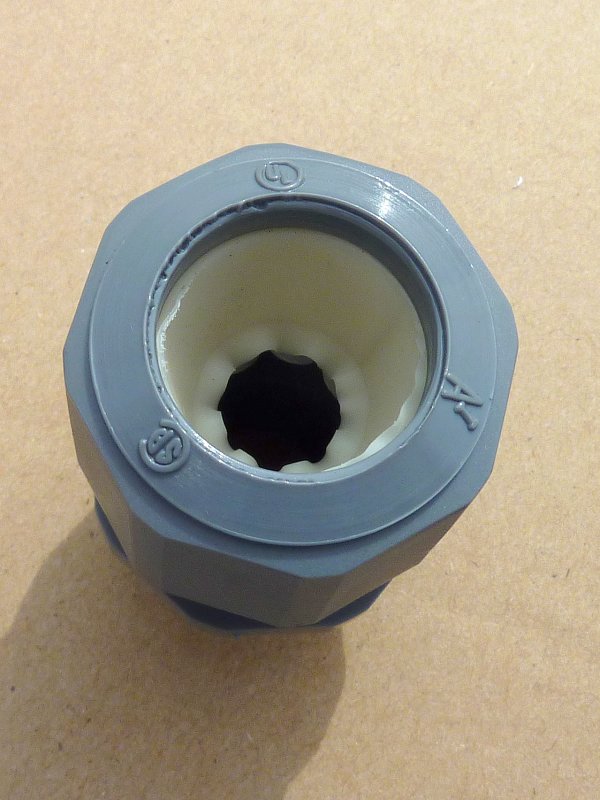
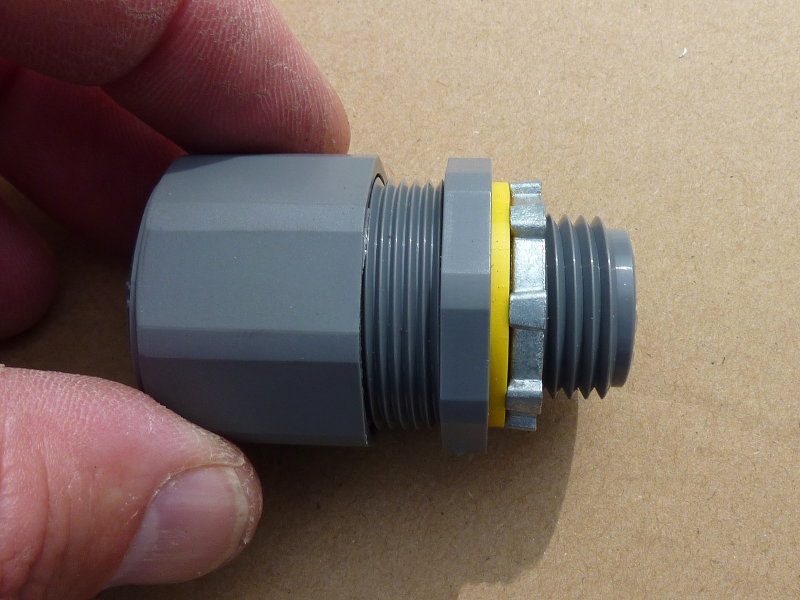
Water Proof Cable Clamp
For the cable entering the j-box I use a waterproof cable clamp. I pick them up at my local electrical supply house for about $3.00 each.. Well worth the expense. They work best if you use a round cable. If using 4GA or larger cable each wire gets its own water tight entrance to the j-box.
Most marine wire is not UV stabilized. Despite the lack of UV inhibitors it can still last in the five to ten year range out in the sun, depending upon where you are. A UV stable SOW, STW, STOW, SEOW, or STOOW type cable can work well and can often be ordered in sizes up to 6/2. These cable types are the same or similar jacketing used in shore power cords and they hold up quite well in solar applications..
23-SEP-2011
The Water Tight Cable Clamp
Here's a close up.
13-SEP-2012
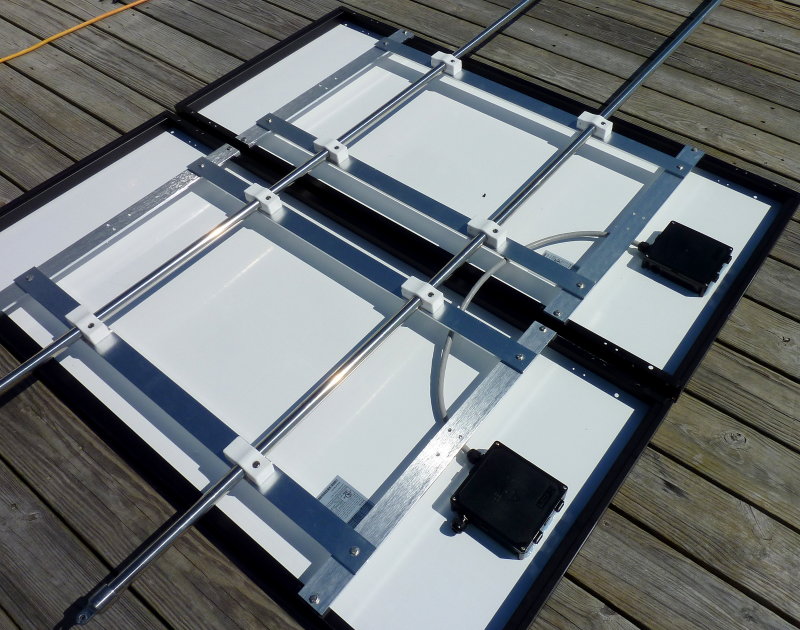
Series or Parallel Wiring ..?
In this photo I am getting ready to install two 140W Kyocera panels for a nice 280W array capable of delivering about 70Ah's + per day to the battery bank, in Maine. They have been wired together in parallel as evidenced by the gray duplex wire running between them for the best performance, on this boat. The term "on this boat" are key to performance.
I get asked quite often about wiring multiple panels together. "Should I wire them in series or in parallel?" is the most often asked question I get. My answer to that question is almost always to wire them in parallel, on a sailboat. The real answer is that "it depends"...
Mono or polycrystalline panels are made up of a series or a daisy chain of solar cells. If you block one of these cells it acts much like a plugged sink drain stopping or greatly minimizing the "flow". Blocking just a small portion of one cell, with shade, can cut the output of both panels, if they are wired in series. The answer to this question is far more complex and really requires actual testing on YOUR BOAT to determine the best overall performance. For the most part though you can do very, very well by wiring the panels in parallel, however, in certain installations series is the clear winner. See, it depends.
By wiring the panels in parallel the shaded panels drop in output will not as drastically affect the other panels output if it is not shaded. When shading occurs across one small area of two series wired panels the output of both can be more drastically affected. When shading occurs across one of the two panels, in a parallel wired array, the other panel still pumps out its current unaffected by the shaded one.
In a perfect lab type scenario series panels with an MPPT controller work really well. Sailboats however are any thing but perfect when it comes to shade. Parallel wiring of multiple panels is often the best scenario, on a sailboat, but not in every case. If you really want to know what is best on your boat for your use then it will need to be measured over time.
Shade, the big "S" word in solar systems, is a real enemy. In this short video we can see the % output drop by shading just a small corner.
Effect of Shade On Panel Performance
As can be seen in the video even a small amount of shading drastically cuts into the output performance.
10-OCT-2014
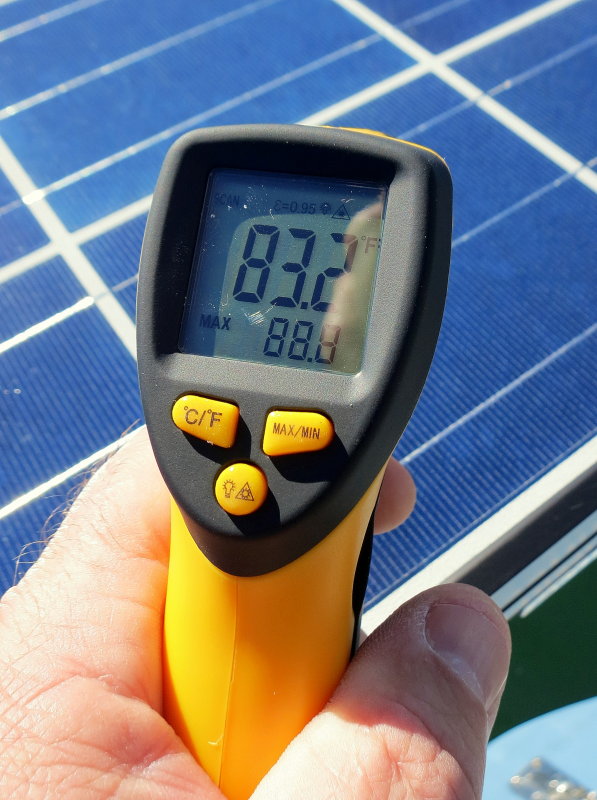
Panel Temperature
One often over looked aspect, that impacts solar performance, is the temperature of the solar panels. Solar panels are rated at what is referred to as STC or Standard Test Conditions. Depending upon the manufacturer this might mean a panel specifications label rated at 20C (68F) or 25C (77F). The Sunwize panel in the beginning of this article is rated at 30 W & 1.8A. However, this is based on a STC temperature of 25�C at an irradiance 1000 W/m�. This means that in order to see 1.8A you will need less than a 77F panel temp and an irradiance level of 1000 W/m�.
How long do you think a panel will remain at 77F in full sun? Will you always have 1000 W/m� irradiance levels? Heck no! These ratings are "best case"... How long will it stay at 77F? The answer is not very long, unless it is a cool day.
On boats we get a bit of a break because the panels are mounted horizontally, and the boats, when at anchor, are facing into the wind thus forcing some cooling effect across the panels. On land they are often on roof tops where cooling is minimal compared to a boat course those panels can be aimed and ours can't so any direct comparison of performance becomes very difficult....
Simply put, as the panel or panels heat up the available output performance goes down. Simple stuff. MPPT controllers, for example, count on sufficient voltage to effect a boost when tracking the panels maximum power point. As the panels heat up the MPPT controller simply has less voltage differential to work with, compared to battery terminal voltage. With less available voltage at lets say 115F it can't boost as well as it could at 77F....
The point?
#1 Don't expect rated 20C or 25C performance from the panel in mid day sun. Look at your daily cumulative totals and average them out.
#2 Do not place panels directly on the deck where they will have less chance of shedding heat.
#3 Consider a 24V nominal panel if you are using MPPT or test your vessel for series performance over parallel. In theory series & MPPT would always win, but in reality, on a sailboat, it does not always win due to shading.
16-DEC-2011
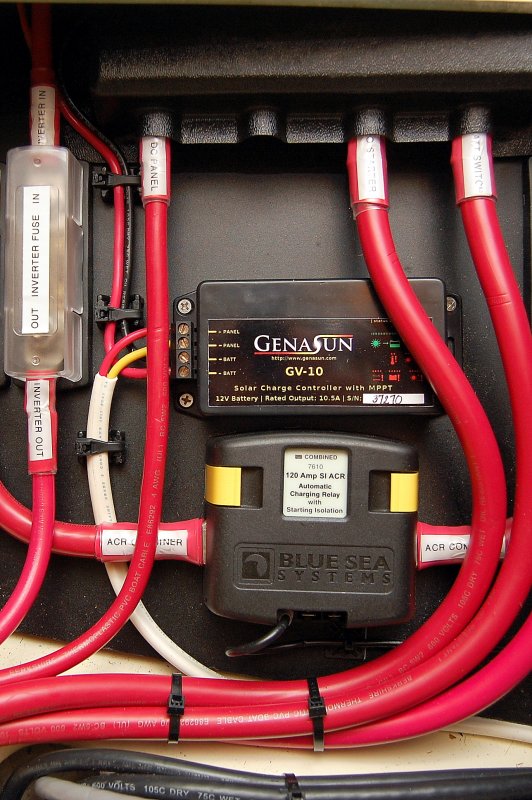
Wire The Controller
A solar panel sized to actually "re-charge" a bank, not just maintain it, should ideally be routed directly to the house bank. The white jacketed wire coming into this Genasun controller is the panel feed. The connections are easy and clearly labeled on most controllers. Hooking them up is the easy part.
The black & red wires leaving the controller go to the house bank. The red wire is "switched" so the panel can be turned off if needed. Check with your controller manufacturer to see where an ON/OFF switch can be installed if you want the ability to flip the panel OFF. ON/OFF switches are normally installed on the battery/output side of a controller but this can vary from manufacturer to manufacturer.
There is also a fuse in the red wire between the battery bank and switch, that can't be seen. It is installed close to the battery + post. When connecting anything directly to a battery bank the wire should be fused. The ABYC suggestion is for the fuse to be within 7" of the + post of the house bank. While not always possible to be within 7" try to get it as close as possible.
If you have a secondary starting or reserve bank you can then use a device like an Echo Charger or an VSR type relay to charge the start or reserve bank and keep it topped up. Even without a solar panel an Echo Charger or VSR are useful devices.
Some charge controllers, such as the Morningstar SunSaver Duo PWM, can charge two banks simultaneously. This is a nice feature if you don't have an Echo Charger or VSR to charge two banks from one array.
10-MAY-2013
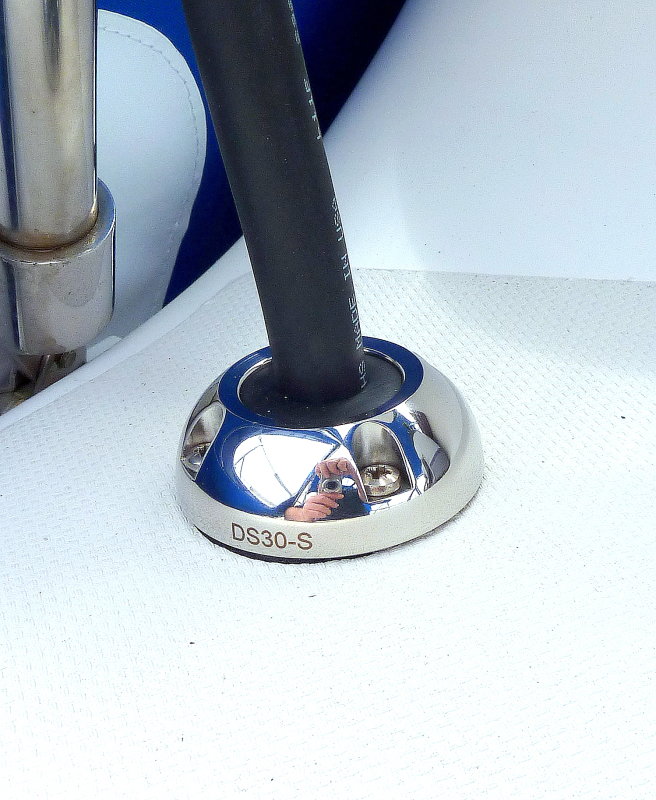
Deck Gland
There are many ways to get your solar wires into the boat but few are as elegant and reliable as the ScanStrut watertight deck glands. I prefer the robust stainless versions but they also make them in a plastic body version as well. This one is a ScanStrut DS30-S.
23-SEP-2011
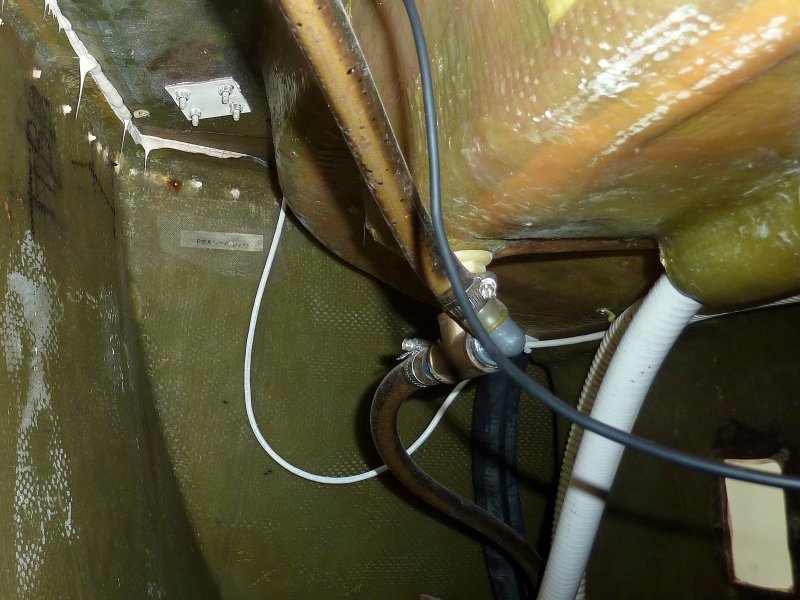
Internal Wiring
When bringing the solar panel wires into the boat it's a good idea to enter the boat with a "drip loop". Deck and fitting leaks happen, it's just the nature of boats, and even "cable clams" can leak.
In the event of a leak the last thing you want is for the leaking water to migrate along the wire all the way to the controller, or another device near the wire that should not come in contact with water.
As always secure the wire well with wire ties on its path to the controller. This one mounted to the underside of the cockpit sole with Weld Mount tabs and wire ties.
23-SEP-2011
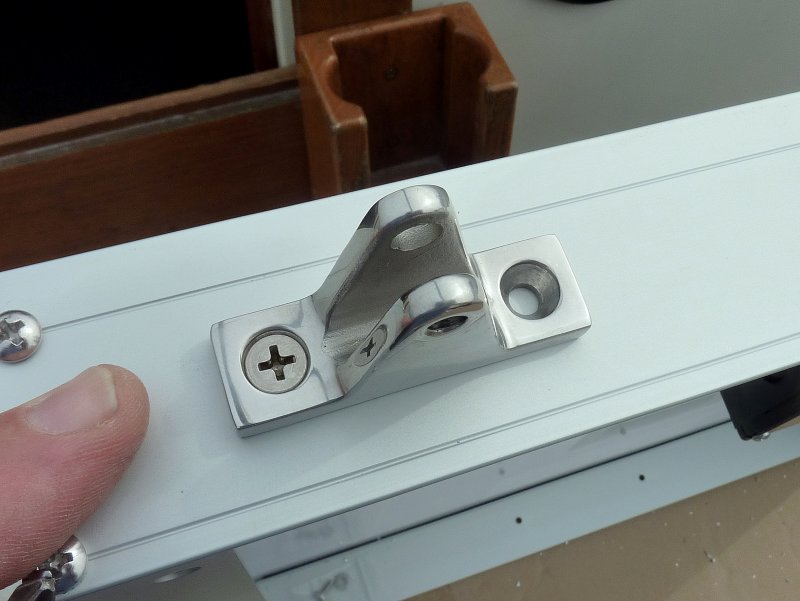
Mounting The Panels
For mounting the panel shown in the first photo I used standard marine canvas parts. This is a standard SS deck hinge fitting. Simply drill the frame and mount two hinge fittings.
23-SEP-2011
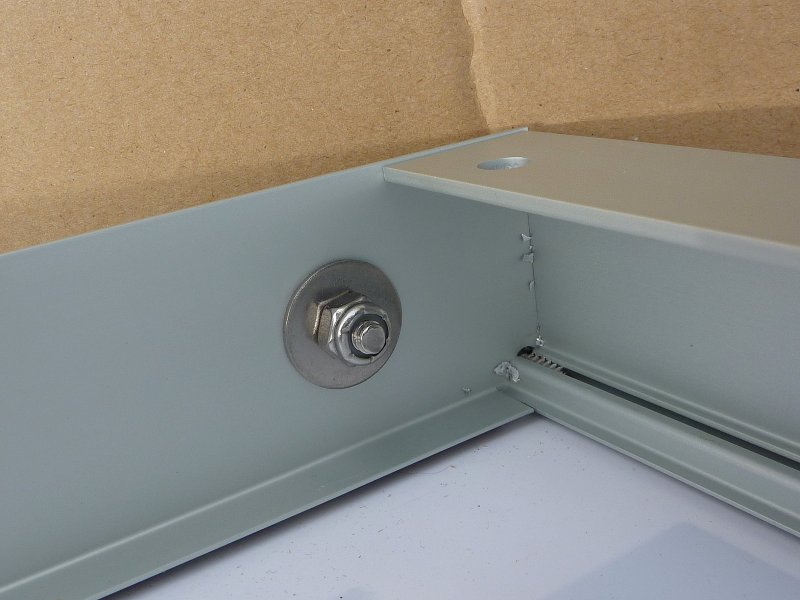
Back Side
In this photo I am showing the back side of the frame mounts. I used some SS fender washers to stiffen the aluminum frame a bit and nyloc nuts so they don't work loose. A little Tef-Gel under the washers seems to prevent stainless/aluminum interface corrosion.
23-SEP-2011
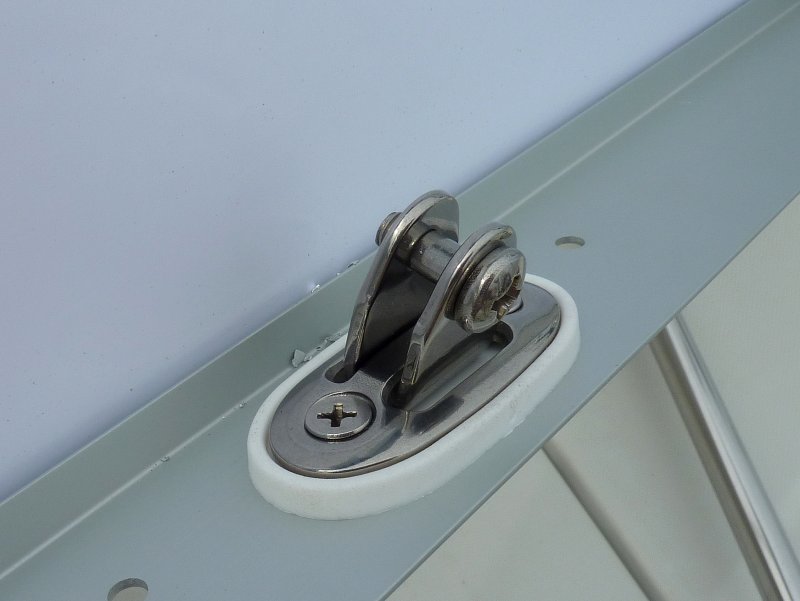
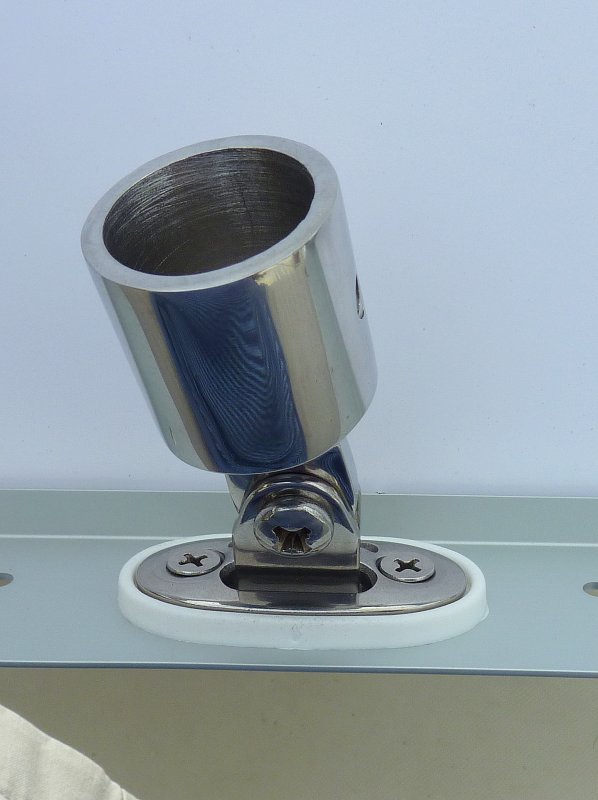
Articulating Deck Mount
This is a foot designed for dodger or bimini mounting on an uneven surface. They are hard to find but most any sail or canvas maker could source it. They are not cheap however. This one runs about $35.00 retail.. The nice thing about this mount is the plastic bushing that isolates it from the aluminum.
The articulating deck hinge accepts the angled 1" support bar and makes for a nice neat looking install.
23-SEP-2011
Tube End Fitting
The tube end fitting simple attaches to the articulated deck hinge and accepts the 1" support bar.
It is a good idea to use TefGel or another dissimilar metals corrosion blocker, such as Lanocoat, on the SS set screws.
23-SEP-2011
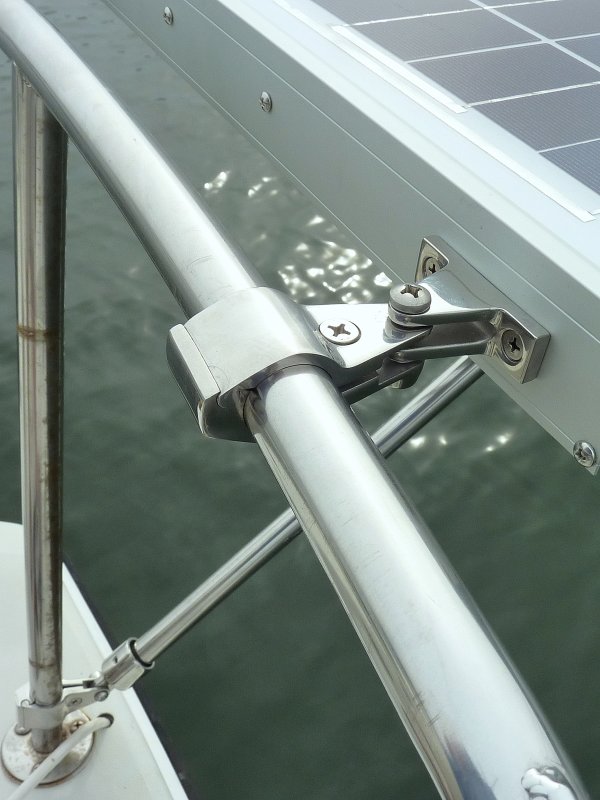
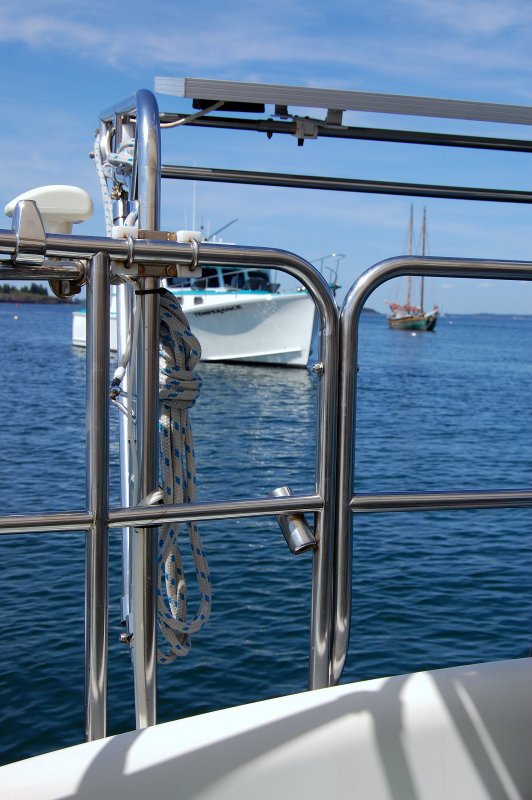
1" Split Rail Clamp
These rail fittings are the cats meow. They are a two piece SS clamp that fits over a 1" piece of SS tubing. They are also available to fit 7/8" tube. Clamp them over the rail and attach them to the panel deck hinges previously mounted to the panel as shown. Once everything is adjusted and aligned tighten the clamp set screw.
If you click on the photo to make it larger you can see the details of the split rail clamp a little better.
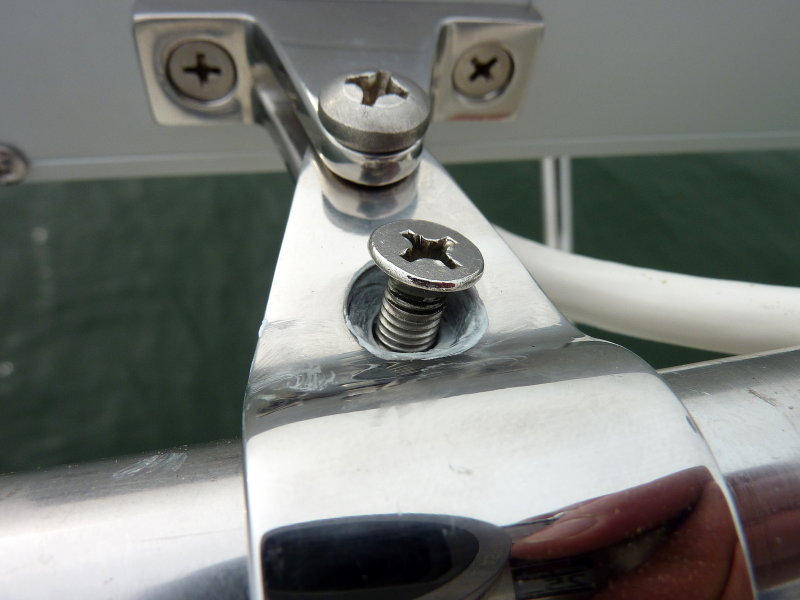
TefGel is one of the best products on the planet to prevent thread galling and seizing of stainless steel fasteners. When using TefGel I have never once had a thread galling situation with SS. Thread galling is when the stainless steel nut & bolt seize together for no apparent reason. Any one who's worked with stainless for long enough has experienced this nuisance. Coat the threads and under the screw head and they will tighten smoothly and without issue.
You can see the TefGel under the screw head here. TefGel also virtually eliminates the corrosion form
ed by using SS fasteners in aluminum!!
23-SEP-2011
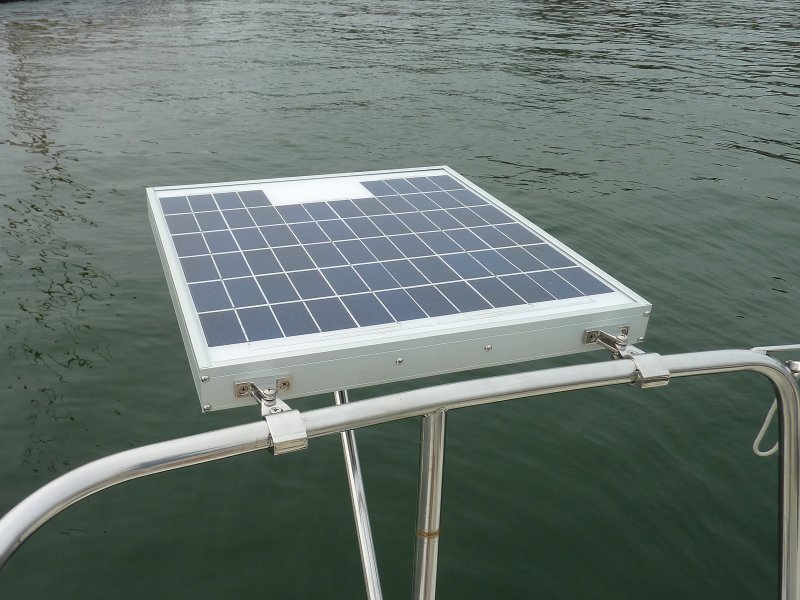
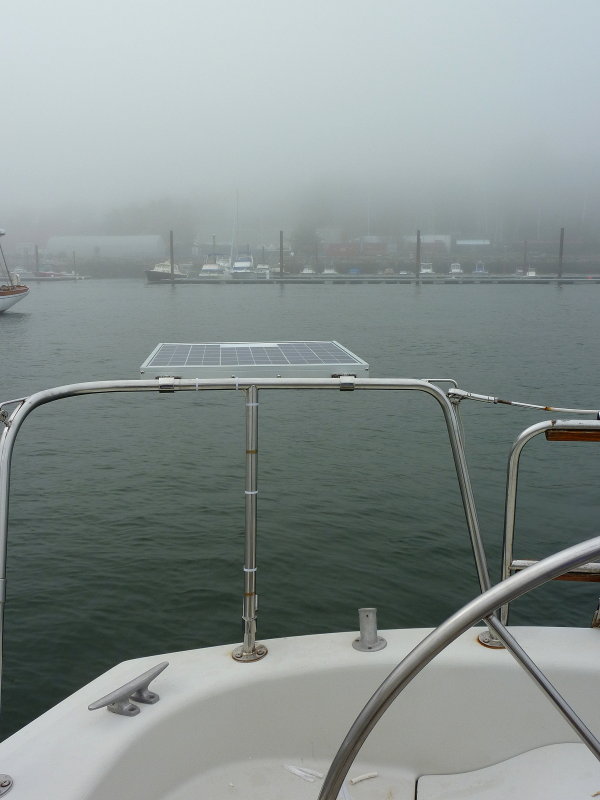
The Finished Panel Installation
This little 30W panel will keep this boats small bank topped up just fine. It is out of the way and easy to remove if needed. Alternatively an adjustable strut could be used to angle the panel towards the sun if you wanted. This one is fixed as the owner simply doesn't want to mess with it.
23-SEP-2011
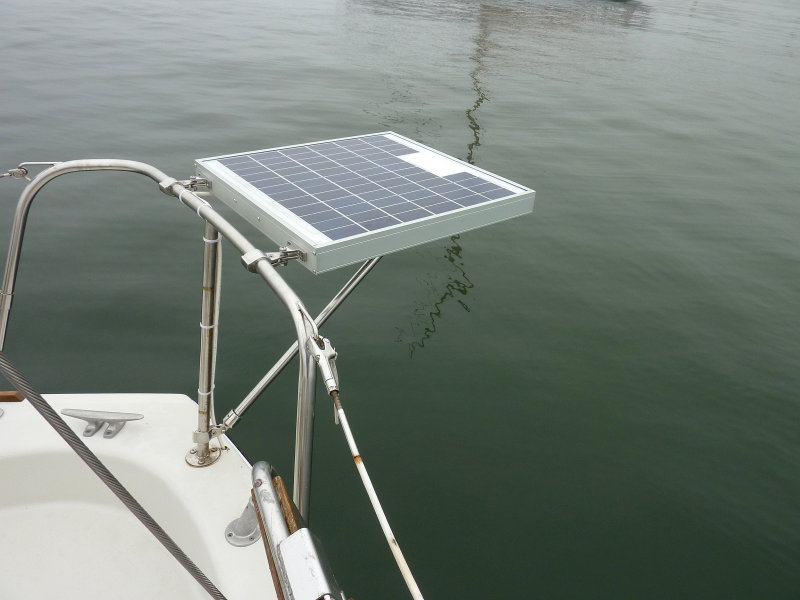
No Sharp Edges
The nice thing about mounting with split rail clamps is that it moves the panel off away from the stern rail. This helps prevent snagging clothes on the panels sharp corners or edges and keeps it out of the cockpit..
04-JUL-2008
Another Option
This panel has been mounted to a cross bar on the davits.
22-JAN-2014
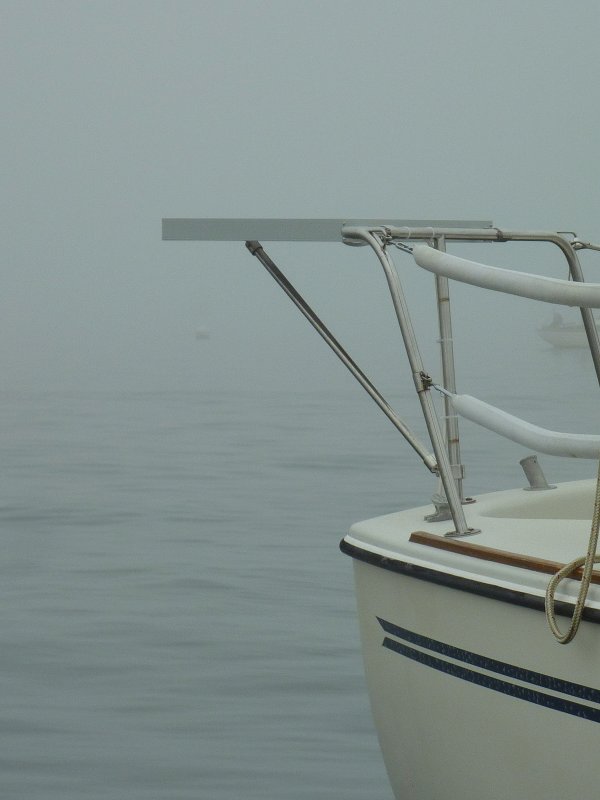
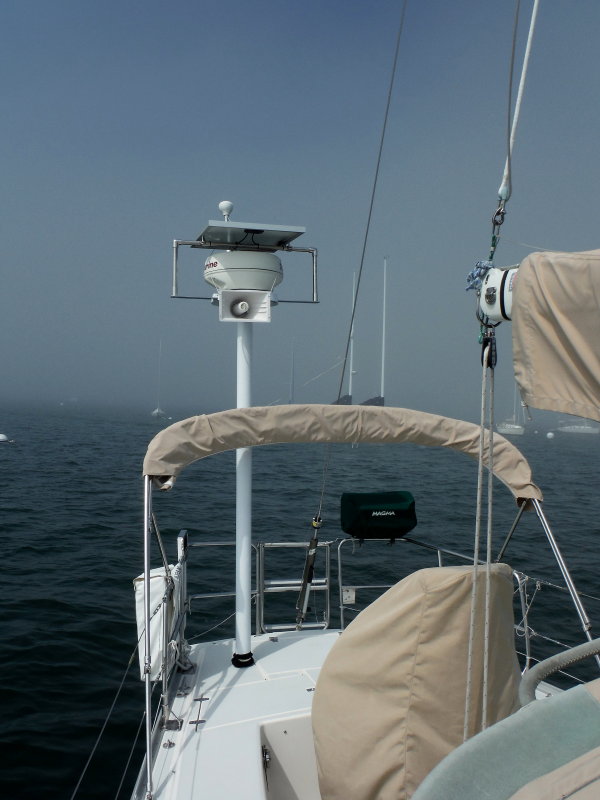
Another Design
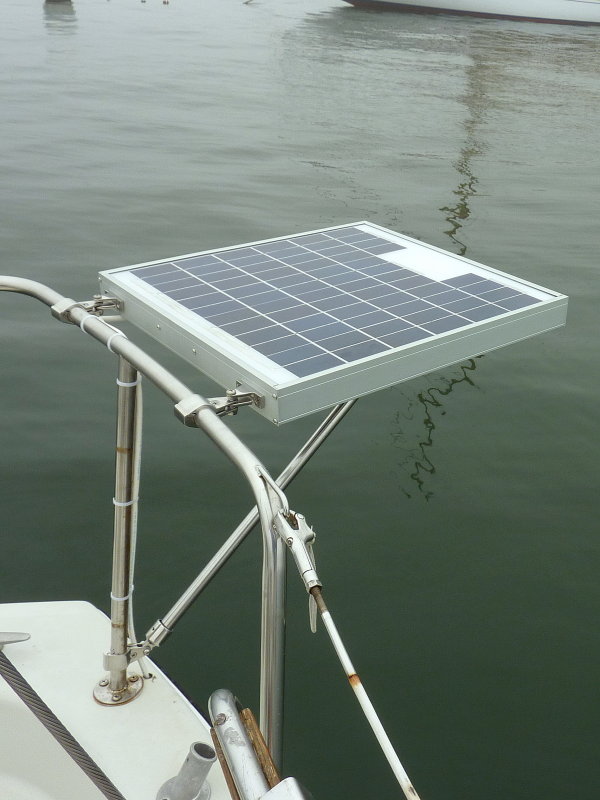
Here is another one of my mount designs for a mooring recharge panel.
For owners with radar poles this is a great spot for a panel. I had my friends up at Nautilus Metals fabricate the "wings" out of 316 stainless steel and I the was then able to cut the 1" SS tube on site and complete the solar mount.
This simple mount provided a perfect spot for a 50W panel which feeds to an MPPT controller then off to the AGM battery bank.. Neat, tidy and using space that was otherwise wasted. The owner loves it and his expensive AGM batteries do too...
15-JAN-2014
Custom Wings
This is one of the two wings I drew up then had fabricated. If you wanted to DIY this it can be done with a standard rail foot mount instead of a welded base tube.. For this customer it was less expensive for me to have my fabrication shop do it and 100% polish them than it was for me to do it....
These wings simply bolt port and starboard to the radar mount and then 1" SS tube and 90 degree dodger fittings can be used to build the rest of, it on-site..
12-JUL-2008
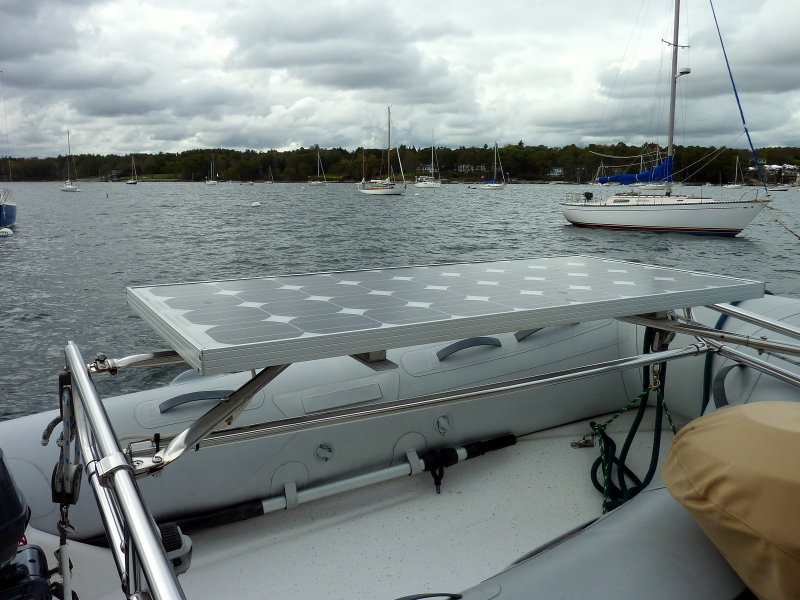
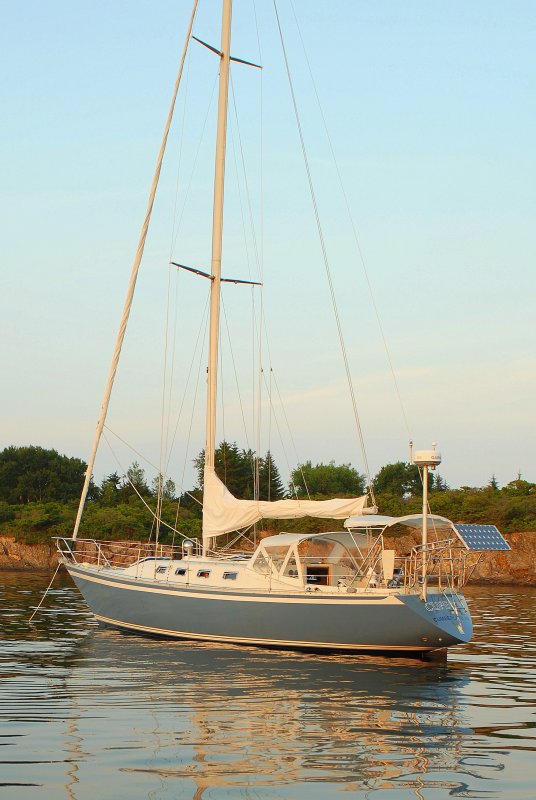
Articulating Panel
By mounting in this fashion it can allow you to capture more of the daily sun by tilting the panel towards it...
There are far to many mounting options to show here and you can get as creative as you want.
Good luck & happy boating!
MAY-2006
Help Support This Site
Like what you saw or read in this article? Was it helpful? Could the information save you some money? Would you like to see more articles like this?
If so feel free to donate, support the site, and keep it growing. Please DO NOT feel obligated at all. If you like it and want to make a donation, please do. Your donations help keep the content coming and also help keep it FREE.
Click the DONATE button below if you would like to make a donation via PayPal.